The short answer: You can make custom patches for clothing using hand embroidery, machine embroidery, iron-on transfer paper, fabric paint, or by ordering professionally online — each method suits a different skill level, budget, and quantity need.
Whether you want to personalize a denim jacket, repair a favorite pair of jeans, or build a brand with consistent garment personalization, custom patches are one of the most satisfying and versatile DIY fashion projects you can tackle.
In my testing across all five methods below, every approach — from a simple iron-on to a fully digitized machine embroidered design — is achievable at home with the right materials and a bit of patience. This guide walks you through everything: tools, techniques, attachment methods, fabric compatibility, design tips, and when it makes sense to go pro.
Let’s stitch into it.
What Are Custom Patches for Clothing? (Quick Overview)
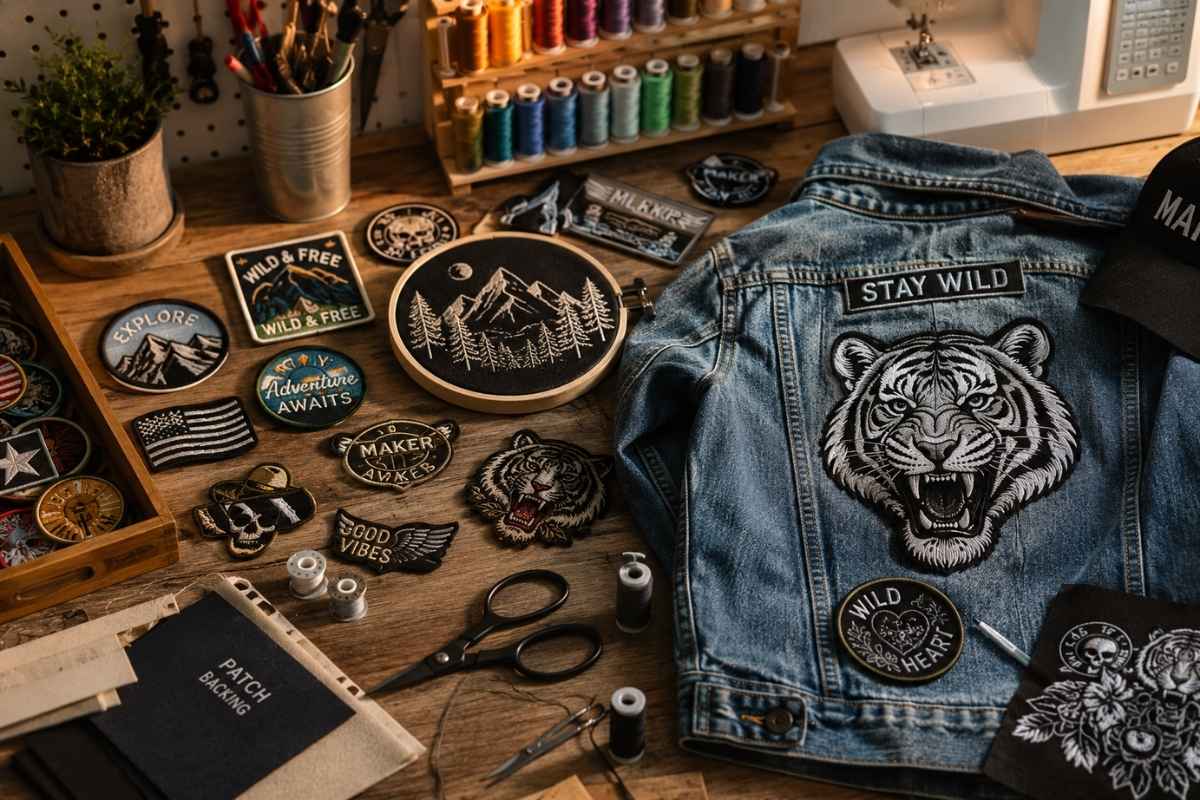
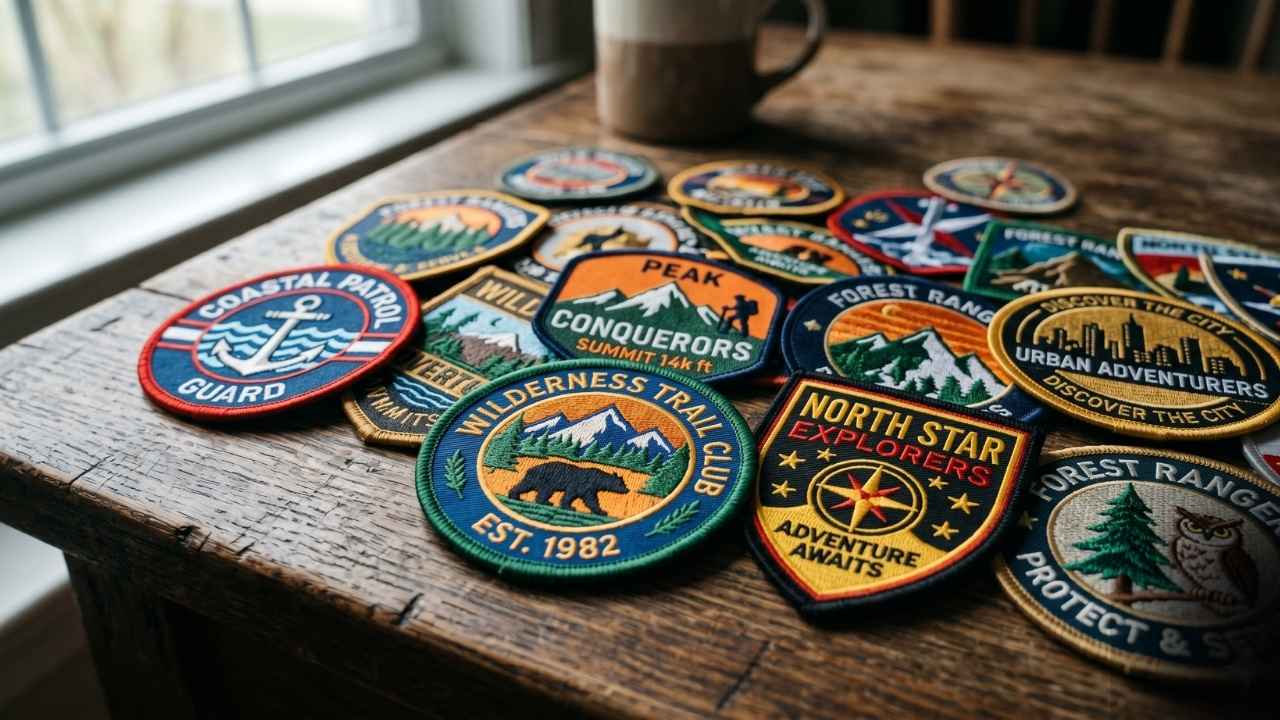
Custom patches for clothing are decorative or branded fabric pieces that can be attached to garments, bags, hats, and accessories. They’re one of the oldest forms of garment personalization — and right now, they’re having a serious streetwear DIY moment.
You’ve likely seen them on everything from military uniforms to varsity jackets, band merch to upcycled fashion collections. The patch market is projected to reach $1.38 billion in 2026 and $2.04 billion by 2035, driven by demand for personalized apparel and print on demand patches.
Types of Custom Patches
- Embroidered patches — the classic. Rich texture, durable, great for logos and text.
- Woven patches — use finer threads for sharper lines and finer detail than embroidery.
- Printed patches — designs printed directly onto a fabric base, best for complex gradients.
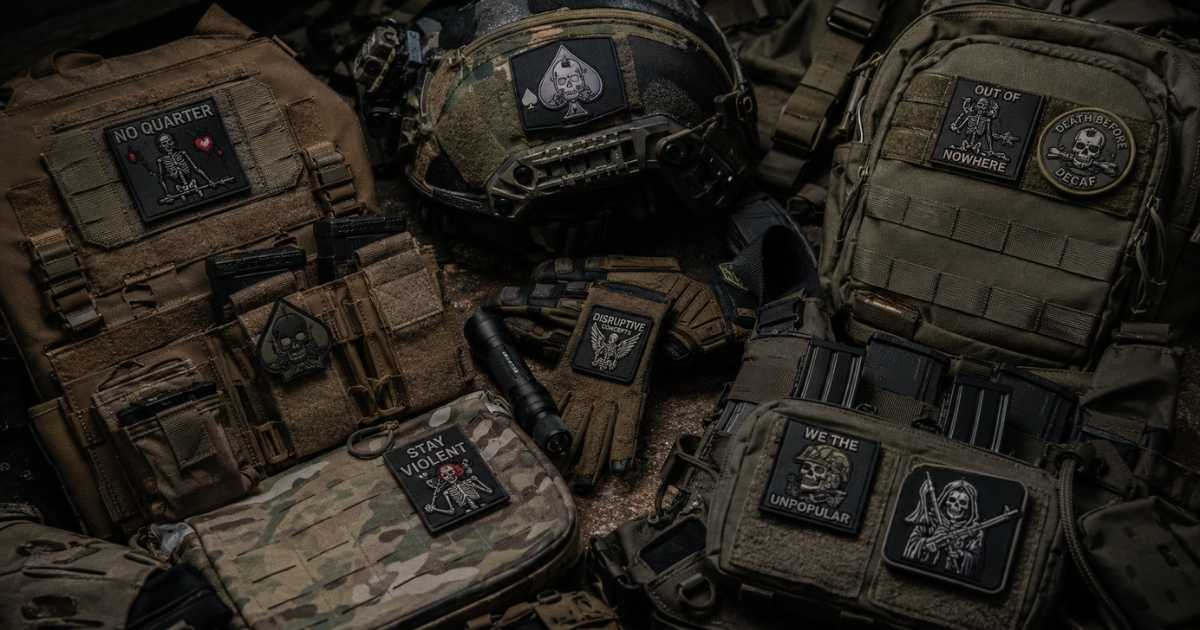
- PVC patches — molded rubber-like patches, waterproof and ideal for outdoor or tactical gear.
- Chenille patches — the fuzzy, varsity-style patches with that retro athletic look.
- Leather patches — premium feel, common on denim and hats, usually laser-etched or debossed.
Where Are Custom Patches Used?
Patches work on virtually any garment or accessory: denim jackets, hoodies, backpacks, hats, uniforms, tote bags, jeans, and boots. The only real limit is the fabric type — more on that in the attachment section.
Materials and Tools You Need Before You Start
The right toolkit makes all the difference. Here’s what you’ll need depending on your method.
Beginner Toolkit
- Fabric base: Twill fabric patches are the gold standard — tight weave, holds up to wear and washing. Felt is beginner-friendly (no fraying edges) and great for a vintage look.
- Embroidery hoop: Keeps fabric taut and prevents puckering while you stitch.
- Needles and thread: Embroidery floss for hand work; polyester thread for machines.
- Stabilizer: Critical for machine embroidery — prevents fabric from distorting. More on stabilizer types below.
- Scissors: Regular fabric scissors plus small fine-point scissors for trimming.
- Water-soluble fabric marker: For tracing your design onto the patch base.
- Iron: For applying iron-on backing or attaching finished patches.
Intermediate / Machine Toolkit
- Embroidery machine: A Brother SE700 or similar home embroidery machine opens up professional-looking results.
- Patch digitizing software: Tools like Embrilliance or Hatch Embroidery convert artwork into machine-readable stitch files. This is where design precision lives — controlling stitch density and fill paths.
- Heat press: More consistent than a household iron for heat-seal patch backing, especially on larger patches.
- Cutting machine: Cricut or Silhouette Cameo can cut precise patch shapes using SVG files.
- Fusible interfacing: Bonds to the back of your patch fabric, prevents fraying, and provides a cleaner edge before embroidery.
Best Fabrics for Patches — Quick Comparison
| Fabric | Best For | Durability | Notes |
|---|---|---|---|
| Twill | Embroidered patches, uniforms | ★★★★★ | Industry standard; holds thread beautifully |
| Felt | Beginner patches, vintage look | ★★★☆☆ | No-fray edges; not ideal for high-wear spots |
| Canvas | Large or decorative patches | ★★★★☆ | Affordable alternative to twill |
| Denim | Fashion patches, upcycled pieces | ★★★★☆ | Rugged and stylish; sewing works best |
| PVC/Rubber | Outdoor, waterproof applications | ★★★★★ | Requires molding; usually ordered professionally |
Are you having trouble on which patch backing type to use for your clothing project? In our in–depth breakdown of iron-on vs sew-on patches we explore durability, washability and the application method as well as determine which works best for jackets & uniforms versus daily wear.
How to Make Custom Patches for Clothing — 5 Methods Explained
There’s no single “right” way to make custom patches for clothing. The best method depends on your tools, your design complexity, and how many patches you need.
Method 1: Hand Embroidery (Best for Beginners and One-Off Pieces)
Hand embroidery is the most personal approach — every stitch reflects your effort. It’s slow but deeply satisfying, and the results have an artisanal quality no machine can replicate.
Best for: Small, personalized patches; gifts; simple logos; vintage-inspired designs. Not ideal for: Large quantities or complex photorealistic designs.
Key stitches to know:
- Satin stitch — smooth, parallel stitches that fill solid areas with a clean, shiny finish. Perfect for lettering and bold shapes.
- Fill stitch — covers larger areas efficiently; direction and density affect the final look.
- Backstitch — strong outline stitch; great for borders and fine detail lines.
A hand embroidered patch lives or dies on stitch density. Too loose and the base fabric shows through; too tight and the patch stiffens unnaturally.
Method 2: Machine Embroidery (Best for Precision and Repeatability)
If you have access to a home embroidery machine, this method gives you professional-grade results at home. The key step most beginners skip is digitizing — converting your artwork into a stitch file your machine can read.
Stabilizer types matter here:
- Cut-away stabilizer — permanent; best for stretchy fabrics.
- Tear-away stabilizer — removed after stitching; good for stable fabrics like twill.
- Water-soluble stabilizer — rinses away completely; ideal for freestanding lace-style patches with clean edges.
Tools like Embrilliance let you control stitch density, thread layering, and stitch direction. For cleaner patch edges that mimic commercial borders, look for pre-digitized merrow border patch designs — these simulate the distinctive rolled thread border used on professional patches.
A magnetic embroidery hoop like those from MaggieFrame keeps fabric perfectly tensioned during stitching, reducing distortion and making hooping easier on thick or layered materials.
If you are looking to make patches then the right accessories not only help out a lot in creating quality stitches but also work easily. Check out the best entry–level home embroidery machine for beginners, best budget home embroidery machine; what to look for before making a purchase.
Method 3: Iron-On Transfer Paper (No Sewing Required)
This is the fastest DIY route and requires no embroidery skills at all. It’s essentially a fabric transfer paper patches method — you print your design, iron it onto a fabric base, and finish the edges.
What you need: Inkjet printer, iron-on transfer paper (invest in quality — cheap paper causes smearing and a plastic-feeling surface), scissors, fabric, and an iron or heat press.
Important: Always mirror your design before printing — the image transfers in reverse. This is the #1 mistake beginners make.
Best for: Quick projects, colorful graphic designs, kids’ clothing, experimenting with designs before committing to embroidery. Not ideal for: High-wear garments or anything washed frequently — the transfer can crack or peel over time.
Method 4: Fabric Paint and Cut-and-Seal Method (Fastest DIY)
Paint your design directly onto sturdy fabric (twill or canvas work well), let it dry, cut it to shape, and seal the edges with a zigzag stitch or fabric sealant. It’s the most freeform approach — great for bold graphics and custom lettering.
Seal the edges carefully. A tight zigzag stitch using topstitching thread or a presser foot with an edge guide gives the cleanest result. You can also use iron-on backing adhesive to fuse the cut patch before stitching.
Method 5: Ordering Professionally (When DIY Isn’t Enough)
Sometimes the project demands more than home tools can deliver — bulk orders, photorealistic printed patches, PVC patches, or chenille patches for a varsity look all typically require commercial production.
The good news: ordering custom patches no minimum has become genuinely accessible. Services like Printful, GS-JJ, and Ninja Patches all offer small-run or no-minimum ordering:
- Printful — ideal for print on demand patches; integrates with ecommerce platforms; twill patches in multiple shapes with iron-on, sew-on, or safety pin backing.
- GS-JJ — factory-direct pricing (as low as $0.18 per patch), free 12-hour digital proof, unlimited revisions, and an AI-powered patch design generator.
- Ninja Patches — fast turnaround (5-day NinjaFast option), premium thread quality, wide range of types including 3D embroidered, PVC, and faux leather patches.
Step-by-Step: Making a Hand-Embroidered Patch from Scratch
Let’s walk through the full process from blank fabric to finished patch.
Step 1 — Design Your Artwork
Start with a clean, simple design. Embroidery handles bold shapes and solid areas well; it struggles with tiny text, fine gradients, or photographic detail. For that kind of complexity, woven or printed patches are better choices.
Free design tools:
- Canva — great for clean logos, text-based designs, and geometric shapes. Export as PNG or SVG.
- Adobe Illustrator — professional vector tool; ideal if you need to hand off files to a professional digitizer or embroidery service.
- Inkscape — free, open-source alternative to Illustrator.
Tip: Design at 2–3x your final patch size. You’ll see more detail and catch problems before they’re stitched into fabric.
Step 2 — Transfer the Design to Fabric
Print your design (at scale) and trace it onto your patch fabric using a water-soluble marker. Alternatively, use a light box or tape the design to a window for backlit tracing.
If you’re using an embroidery machine, load your stitch file into the machine software at this stage. For Embrilliance users, this is where you preview stitch paths and adjust stitch density — typically 40–50 stitches per cm² for a solid, professional finish.
Step 3 — Embroider (Hand or Machine)
Secure your fabric in an embroidery hoop. Keep the fabric taut but not stretched — the goal is stability without distortion.
For hand embroidery: Work outlines first with backstitch, then fill areas with satin stitch or fill stitch. Work from the center outward to prevent puckering.
For machine embroidery: Run a test stitch on scrap fabric first. Check stitch density, thread tension, and color registration before committing to your final patch fabric.
Step 4 — Cut and Finish the Edges
Once stitching is complete, cut the patch to shape. Leave a 3–5mm border around your embroidery.
Edge finishing options:
- Merrow border (commercial look) — a rolled overlock stitch around the perimeter. Requires a specialized merrow machine or pre-digitized merrow border patch file.
- Zigzag stitch — achievable on any home sewing machine; set stitch length short and width wide.
- Felt backing — simply cut felt to match the patch shape; no fraying, no stitching needed.
Step 5 — Add Patch Backing
The backing determines how you’ll attach the patch to clothing. This is a critical decision — choose based on how permanent you want the attachment to be.
See the full backing comparison table in the next section.
You have to have a design that works for embroidery before stitching your custom patch. Beginner–Friendly Guide: How to Choose Your Tools or how can I design wool embroidery patterns using any tools like free?
How to Attach Custom Patches to Clothing
Attaching a patch correctly determines whether it lasts one wash or a lifetime. Here are your main options.
Iron-On Method
The most popular method for casual use. The patch has a heat-activated adhesive on the back that bonds to fabric when pressed.
How to do it right:
- Pre-heat your iron to the cotton/high-heat setting (or use a heat press at 300–320°F / 150–160°C — that’s the sweet spot for heat press temperature on twill).
- Place the garment on a hard, flat surface — not an ironing board, which flexes under pressure.
- Position the patch face-up on the fabric.
- Cover with a pressing cloth (a thin cotton towel works).
- Press firmly for 25–30 seconds. Don’t slide the iron — straight downward pressure only.
- Allow to cool completely before moving.
- Flip and press from the reverse side for 15 seconds to bond the adhesive fully.
Pro tip from my testing: Even a perfectly applied iron-on patch benefits from a few stitches around the perimeter. After 15+ wash cycles, edges on unsewn iron-on patches begin to lift — especially at corners. A simple whip stitch or backstitch around the edge adds years of life.
Sew-On Method
The most durable attachment method. No adhesive, no heat — just thread.
Best stitches for patch sewing:
- Whip stitch — quick, neat, visible decorative edge.
- Backstitch — strongest and most secure; nearly invisible when done carefully.
- Running stitch — simplest; fine for lightweight patches on non-stress areas.
Use thread that matches either the patch border or the garment, depending on whether you want the stitching visible.
Heat Press Method
A heat press delivers consistent, even pressure across the entire patch surface — no hot spots, no missed corners. If you’re making patches in quantity for a brand or team, a heat press is worth the investment.
Heat press temperature varies by patch type: twill embroidered patches typically need 300–320°F for 15–20 seconds at medium pressure. PVC patches require lower temperatures. Always follow the manufacturer’s pressing instructions.
Velcro Patches
Hook-and-loop attachment makes patches removable and interchangeable — popular in tactical gear, military applications, and for people who like to rotate their patch collection. Sew one half of the Velcro to the garment, the other to the patch backing.
Patch Backing Types Explained — Which One Should You Choose?
| Backing Type | Permanence | Best Fabrics | Notes |
|---|---|---|---|
| Iron-on | Semi-permanent | Cotton, denim, canvas | Fastest; reinforce with stitches for longevity |
| Sew-on | Permanent | Any fabric | Most durable; time-intensive |
| Heat press | Semi-permanent | Cotton, twill, poly blends | Consistent bond; needs equipment |
| Velcro | Removable | Any | Great for tactical/interchangeable use |
| Adhesive (peel & stick) | Temporary | Smooth surfaces | Not wash-safe; best for events or crafts |
| Paper backing | None | N/A | Protects patch before application only |
The sew on vs iron on patch debate comes down to use: iron-on is perfect for decorative patches on low-stress areas; sew-on is non-negotiable for high-wear zones like sleeves, knees, or backpack straps.
One of the simplest alternatives to upgrade your sad denim into a unique and beautiful piece is by adding some custom patches. Find your inspiration here, on how to customise a denim jacket with embroidered patches, paint details and studs – DIY streetwear when it comes down to it.
Which Fabrics Can (and Can’t) Use Iron-On Backing?
| Fabric | Iron-On Safe? | Notes |
|---|---|---|
| Cotton / denim | ✅ Yes | Ideal; holds adhesive well |
| Canvas | ✅ Yes | Great for bags and heavy garments |
| Polyester blends | ✅ With care | Lower heat; test first |
| Nylon | ⚠️ Caution | Can melt; use sew-on instead |
| Leather | ❌ No | Use stitching or strong fabric glue |
| Velvet / delicate fabrics | ❌ No | Heat damages the pile; sew on only |
Custom Patch Design Tips for Beginners
Great patches start with great design decisions. Here’s what actually matters.
Patch Sizing Guide
Size your patch to its location:
- 1–2 inches — hats, lapels, small bag pockets
- 3–4 inches — shirt chest, sleeve, smaller jacket areas
- 4–6 inches — jacket back panels, hoodie fronts
- 6–12 inches — large back designs, varsity jacket panels
Embroidery patch design works best with bold, well-defined shapes at these sizes. Avoid tiny text below 0.5 inches — stitches can’t render it cleanly.
Design Limitations by Patch Type
- Embroidered patches: Bold shapes, solid fills, clean outlines. Avoid fine gradients.
- Woven patches: Finer detail than embroidery; tighter thread means sharper lines and smaller text.
- Printed patches: Full-color gradients and photographic detail possible, but less texture than stitched types.
- PVC patches: Bold, graphic shapes with strong color contrast work best; fine detail can be lost in molding.
- Chenille patches: Large, bold designs only — the fuzzy loop pile eats fine detail.
2026 Design Trends Worth Knowing
The current wave in patches is all about texture and dimension:
- 3D puff embroidery — foam underneath the thread creates a raised, tactile look that’s dominating streetwear DIY right now.
- Glow-in-the-dark and reflective threads — increasingly used for night-visible designs on jackets and bags.
- Oversized patches — large side appliqués and back panels are a major statement in current custom embroidery patches culture.
- Retro revival — ’70s, ’80s, and ’90s aesthetic patches (vintage sports logos, retro typography) are everywhere in upcycled fashion circles.
DIY vs. Professional Custom Patches — Honest Comparison
This is the decision most guides gloss over. Here’s the real breakdown.
When to DIY
- You need 1–10 patches for personal use.
- Budget is tight and you have the time to invest.
- The personal, handmade quality is part of the point.
- You want to experiment with embroidery patch design before committing to bulk production.
Realistic DIY cost: $5–20 per patch depending on method and materials. Hand embroidery is cheapest in materials but most expensive in time.
When to Order Professionally
- You need 25+ consistent patches for a team, brand, or event.
- You want PVC patches, chenille patches, or woven patches — these require specialized production equipment.
- You need a merrow border patch finish that looks commercially produced.
- You’re launching a product line and quality consistency is critical.
Professional cost: From $0.18–$3.02 per patch depending on type, size, and quantity. Platforms like GS-JJ and Ninja Patches offer no-minimum ordering for smaller runs, while Printful integrates directly with ecommerce stores for automated print on demand patches fulfillment.
The Middle Ground: Print-on-Demand
For creators and small brands, print on demand patches via Printful mean you can list custom patches in your store with zero inventory risk. Every patch is made when ordered and shipped directly to your customer. The tradeoff is slightly higher per-unit cost compared to bulk manufacturing through GS-JJ or Ninja Patches.
How to Make Custom Patches Last Longer (Care & Durability Tips)
Making a great patch is only half the job. Keeping it looking great is the other half.
Washing Instructions for Patched Garments
- Turn garments inside out before machine washing — this protects both the patch face and the bonding adhesive.
- Cold water, gentle cycle — heat and agitation are the enemies of iron-on adhesive.
- Air dry when possible — tumble dryer heat can loosen iron-on patches over time.
- Never dry-clean patches that use iron-on backing — the solvents dissolve the adhesive.
How to Re-Adhere a Loose Iron-On Patch
It happens — especially at corners. Here’s how to fix it without removing the patch:
- Slip a small piece of fusible interfacing or iron-on webbing tape under the lifted edge.
- Cover with a pressing cloth.
- Press firmly with a hot iron for 20 seconds.
- Cool completely before wearing.
If the patch is fully lifting, remove it completely (a hair dryer on low heat softens the adhesive), re-apply fresh iron-on adhesive, and reattach.
Reinforcing Iron-On Patches for Maximum Longevity
In my testing, the single biggest factor in iron-on patch longevity is edge stitching. A simple whip stitch or backstitch around the perimeter — even just catching the patch edge every 3–4mm — held patches securely through 20+ wash cycles where unsewn patches had begun peeling at corners by wash 10.
Eco-Friendly Patch Making in 2026 — A Sustainability Angle Worth Knowing
One angle almost no guide covers: patches and upcycled fashion are a natural match.
Old denim, worn-out shirts, leftover fabric from past sewing projects — all of these make excellent patch bases. Upcycling not only cuts costs but gives your patches a story and an authentic character that new fabric can’t replicate.
Eco-conscious material swaps:
- Organic cotton twill — increasingly available from specialty fabric suppliers; same durability as conventional twill with a lower environmental footprint.
- Recycled polyester threads — several embroidery thread brands now offer recycled options without sacrificing color vibrancy.
- Plant-based fabric adhesives — an emerging alternative to petroleum-based iron-on adhesive for those building a fully sustainable product line.
If you’re a creator selling patches, the sustainability story is also a marketing story — conscious consumers in 2026 respond to it.
Frequently Asked Questions
Can I make custom patches at home without an embroidery machine?
What is the best fabric for embroidered patches?
How do I make iron-on patches stick permanently?
How long do iron-on patches last?
Can I iron patches onto nylon or polyester?
What software do I use to digitize a patch design?
How much does it cost to make custom patches professionally?
Conclusion — Your First Custom Patch Starts Today
Learning how to make custom patches for clothing is one of those skills that compounds: once you understand the basics, every project teaches you something new about design, material behavior, and the interplay between stitch density and final appearance.
Start simple. A hand embroidered patch on felt, backed with iron-on adhesive and finished with a zigzag stitch, is a completely achievable first project. Once you’re comfortable, layer in complexity — machine embroidery, merrow border patch finishing, fabric transfer paper patches for full-color graphics, or experimenting with woven patches and PVC patches through a professional service.
For bulk production, branding, or when you want chenille, PVC, or leather patches, platforms like Printful, GS-JJ, and Ninja Patches make custom patches no minimum and professionally finished a reality at accessible price points.
Whether your goal is streetwear DIY, building a merchandise line, repairing beloved garments through upcycled fashion, or simply adding a patch for a denim jacket that tells your story — the tools, the techniques, and the creativity are all within reach.
Now go make something worth wearing.
Pingback: Best Embroidery Machines for Beginners in 2026: Tested & Ranked - Apex Patches
Pingback: Iron-On vs. Sew-On Patches: Which Lasts Longer? Expert Guide - Apex Patches
Pingback: How to Design Embroidery Patterns for Free: Complete Guide + Free Tools - Apex Patches
Pingback: How to Customize a Denim Jacket: 11 Ideas to Make It Uniquely Yours - Apex Patches