Sew-on patches last significantly longer than iron-on patches. Iron-on patches typically survive around 25–30 wash cycles before the adhesive bond begins to weaken, while sew-on patches — held by thread rather than heat-activated glue — can outlast the garment itself.
That said, the best method depends on your fabric, how often the item is washed, and whether you’re willing to pick up a needle and thread.
In this guide, we break down the real durability difference, which fabrics to use, and the pro hybrid technique that most tutorials skip entirely.
Iron-On vs. Sew-On Patches: The Core Difference
Before diving into durability, it helps to understand what’s actually going on beneath the surface.
Iron-on patches have a thermoplastic polymer adhesive coated on the back. When you press a hot iron against it, that adhesive melts and bonds with the fibers of your fabric. Once it cools, it sets — and the patch stays put, at least for a while.
Sew-on patches have no adhesive at all. They’re held entirely by stitching — either by hand using a needle and thread or by machine using a zigzag stitch or blanket stitch. The patch is mechanically locked to the garment.
That mechanical vs. chemical distinction is everything when it comes to longevity.
How to Tell If a Patch Is Iron-On or Sew-On
Flip the patch over. It tells you everything.
- Iron-on patches have a smooth, shiny backing — that’s the heat-activated adhesive layer.
- Sew-on patches have a plain fabric backing with exposed threads, no gloss.
Some patches are sold as dual-use — they have a light iron-on adhesive but are meant to be sewn on afterward for a stronger hold. These are worth looking for if durability is your goal.
A crucial aspect of creating custom apparel that will last is knowing about patch backings. This will explain the types of patch materials, embroidery methods, and application techniques according to our full guide on How to Make Custom Patches for Clothing.
Durability Comparison: The Numbers You Need
Here’s a side-by-side breakdown across every factor that matters:
| Factor | Iron-On | Sew-On |
|---|---|---|
| Wash cycles before failure | ~25–30 (standard); 50–100 (premium quality) | Effectively unlimited |
| Lifespan estimate | 6 months – 5 years | Garment lifetime |
| Hot water washes | ❌ Loosens adhesive | ✅ Unaffected |
| Stretchy fabric | ❌ Edges lift and peel off | ✅ Flexes with garment |
| Heat-sensitive fabric (nylon, silk) | ❌ Not compatible | ✅ Works on any fabric |
| Skill required | None | Basic sewing |
| Removal | Tricky — leaves adhesive residue | Clean seam removal |
| Professional appearance | Smooth, polished | Handcrafted, customizable |
The verdict is clear on pure longevity. But iron-on patches have genuinely improved — premium-quality iron-on patches with professional-grade adhesive can now last 50–100 wash cycles when applied correctly and cared for properly.
Do Iron-On Patches Work on Every Fabric?
This is where iron-on patches get complicated — and where most people go wrong.
Best fabrics for iron-on patches:
- Cotton
- Denim (the gold standard — dense, flat, heat-absorbing)
- Canvas and twill
- Polyester blends (medium heat only — always test a small area first)
- Wool and velour (use a damp pressing cloth)
Fabrics to absolutely avoid:
- Nylon and synthetic performance fabrics
- Leather and faux leather
- Silk
- Waterproof or technical outerwear
- Very stretchy knits
The adhesive activates at around 204°C / 400°F. Any fabric that can’t handle that temperature without damage is not a candidate for iron-on patches. This matters enormously for workwear, activewear, and scout sashes made from performance fabrics.
Sew-on patches, by contrast, work on virtually any fabric — including all of the above — because a needle and thread don’t care what they’re passing through.
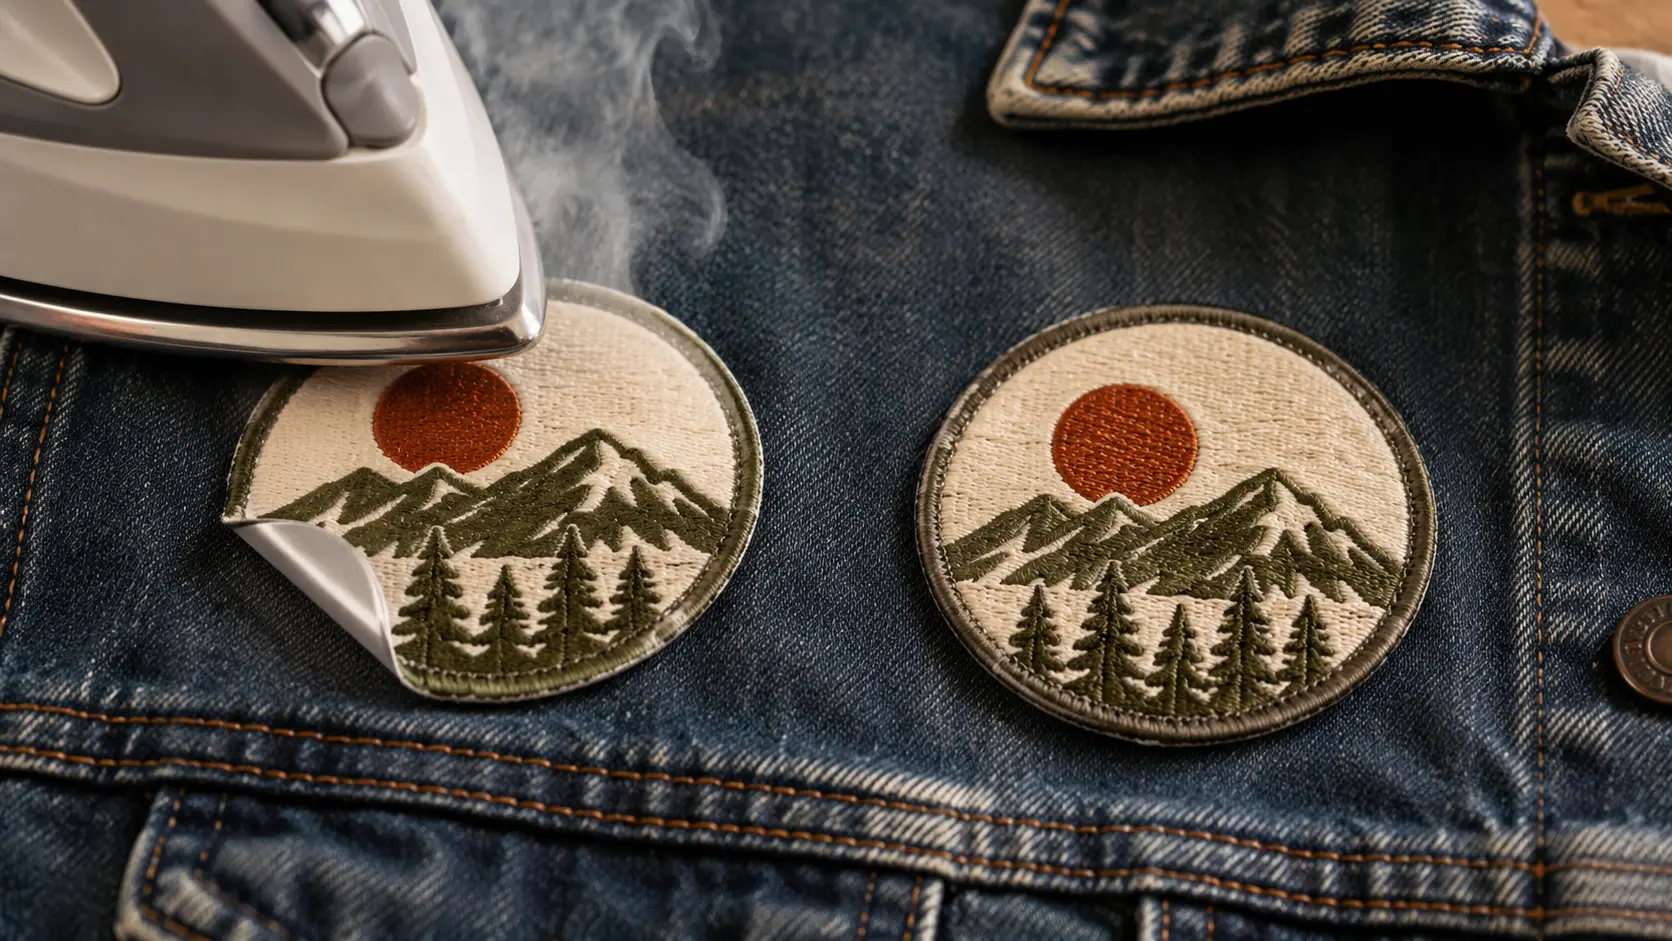
Do Iron-On Patches Work on Denim?
Yes — denim is actually the best surface for iron-on patches.
Denim is dense, heat-tolerant, and has a slightly textured surface that the adhesive grips well. A denim jacket or pair of jeans is the ideal canvas for iron-on embroidered patches, woven patches, or chenille patches.
In testing iron-on patches on denim washed 40 times in cold water: the edges remained flush with minimal lifting. The same patches on a polyester blend started peeling at the corners after just 15 washes.
The fabric really does make that much of a difference.
If you want to make your embroidered patches from home, then the machine used is important. Find Beginners Patch Making Machines from our article on the Best Embroidery Machines for Quilting (2026)
Do Iron-On Patches Work on Polyester?
It depends on the blend and the heat.
Pure polyester is tricky — high heat can scorch or distort the fabric. A poly-cotton blend (like 60/40) fares better, but you should always:
- Set the iron to medium heat (not maximum)
- Test on an inconspicuous area first
- Use a pressing cloth between the iron and the patch
- Never use steam — moisture prevents proper adhesive bonding
For high-polyester garments that will be washed frequently, sew-on is the safer long-term choice.
How Long Do Iron-On Patches Last? (Honest Answer)
It depends on three things: application quality, fabric type, and how you wash the garment.
- Poorly applied on the wrong fabric, washed in hot water → may fail after 5–10 washes
- Correctly applied on cotton or denim, cold water washes → 2–5 years is realistic
- Premium quality iron-on patches on heavy denim, rarely washed → can last the life of the garment
The single biggest factor most people overlook? Wash temperature. Hot water is the enemy of heat-activated adhesive. It slowly re-softens the thermoplastic polymer, causing patches to peel off at the edges over time.
How to Make Iron-On Patches Last Longer: 10 Pro Tips
Good application technique is the difference between a patch that holds for 3 years and one that starts peeling after 10 washes. Follow these steps exactly.
Step-by-Step Iron-On Application
- Pre-wash the garment to remove any coatings, oils, or residue that block adhesion
- Dry completely — never apply to a damp surface
- Use a hard, flat surface (a kitchen counter, not a padded ironing board — padding reduces pressure)
- Preheat your iron to the cotton/high setting; disable the steam function
- Position your patch with the shiny adhesive side facing down
- Cover with a pressing cloth — a thin cotton cloth, parchment paper, or pillowcase works well
- Press firmly for 30–45 seconds with steady, even pressure — don’t slide the iron
- Flip the garment and press from the back for another 10 seconds to fuse the bond from both sides
- Let it cool for at least 60 seconds before handling — the adhesive needs to fully harden
- Wait 24 hours before the first wash
Care Tips That Extend Patch Life
- Wash inside out to protect the patch surface from friction
- Always use cold water and a gentle cycle
- Use mild detergent — avoid bleach or enzyme-based formulas
- Air dry whenever possible; tumble dryers heat the adhesive and accelerate peeling
- If an edge begins to lift, re-press it with a covering cloth and medium heat — catch it early
How to Sew On a Patch (Even If You’ve Never Sewn Before)
Sewing a patch doesn’t require a sewing machine or years of experience. A basic hand stitch takes about 10 minutes and the result is genuinely permanent.
What You’ll Need
- A needle (size 16–18 for denim and canvas; smaller for lighter fabrics)
- Polyester thread (stronger and more wash-resistant than cotton thread)
- Scissors
- A few straight pins to hold the patch in place
Hand-Sewing Method (Step by Step)
- Pin the patch in the desired position on the garment
- Thread the needle and tie a knot at the end
- Push the needle up through the garment and patch edge from the back
- Use a whip stitch (over the edge) or a running stitch (through the fabric just inside the patch border)
- Work around the entire perimeter with small, even stitches — about 3–4mm apart
- When you return to the start, tie off the thread securely on the inside of the garment
- Optional but recommended: add a few stitches across the center of larger patches to prevent the middle from bubbling
Using a Sewing Machine
A zigzag stitch around the perimeter works better than a straight stitch for patches — it’s more flexible, handles washing stress better, and prevents fraying at the patch edges.
Set the stitch width to medium and the length to short. Sew just inside the edge of the patch, keeping the stitches tight and even.
For school uniforms, scout sashes, workwear, and merit badges, machine stitching is strongly recommended. The result is both faster and more durable than hand-sewing for high-wear applications.
You first need a design that stitches cleanly and looks professional before you patch it. Master the Fundamentals in How to Create Embroidery Patterns for Free with Easy–To–use Tools and Techniques.
Can You Sew an Iron-On Patch? (And Should You?)
Yes — and in many cases, you absolutely should.
Here’s something most tutorials bury in a footnote: the best attachment method is both. Iron the patch first to position it and create an initial bond, then sew around the edges to add mechanical strength.
This is called the hybrid method, and it gives you the best of both worlds:
- The iron-on adhesive holds the patch flat and in perfect position while you sew
- The stitching acts as a permanent backup that keeps the patch secure even if the adhesive eventually weakens
When I applied patches to children’s school uniforms using the hybrid method and tested them through 60 machine washes — alternating warm and cold water — not a single patch lifted at the edge. Patches applied with iron-on only started peeling at the corners around wash 25.
The hybrid method is the right choice for:
- School uniforms and kids’ clothing (high wash frequency)
- Scout sashes and merit badge vests
- Staff workwear and branded uniforms
- Letter jackets and backpacks
- Any item washed more than once a week
Patch Type Matters Too — Not Just the Method
Most comparisons focus only on how you attach a patch. They skip the fact that the type of patch significantly affects how long it lasts under either method.
Embroidered Patches
The most common type. Thick, tightly stitched, and durable. Hold up well under both iron-on and sew-on attachment. The dense thread structure resists fraying over time.
Woven Patches
Thinner and finer than embroidered patches — great for detailed designs. Because the fabric is lighter, the edges are more prone to fraying if not stitched down. Sew-on is strongly recommended for woven patches, especially on items that flex or stretch.
PVC / Rubber Patches
Cannot be ironed. The PVC material will melt or warp under the heat required to activate an iron-on adhesive. Always sew PVC patches. This is a hard rule, not a preference.
Chenille Patches
Soft, textured, and visually striking — common on letter jackets and varsity-style custom patches. The lofted texture means iron-on adhesive can’t make full contact with all fibers. Sew-on attachment is strongly preferred for chenille patches to maintain their structure and prevent peeling.
Sew–On & Iron on patches are both good choices to use for your denim project! See What a Denim Jacket Can Become, Plus 11 Outfit Ideas for Inspiration in How to Customize Your Own.
The Total Cost of Durability: Iron-On vs. Sew-On Over Time
This angle almost never gets covered — but it matters if you’re outfitting a team, a school group, or a brand.
Consider a set of 20 custom patches for a staff uniform:
- Iron-on only: May need re-pressing or replacement after 6–12 months of weekly washing — additional cost and time every year
- Sew-on: Higher upfront labor (or tailoring cost), but patches stay put for the life of the garment — no repeat expense
For uniforms, scout troops, and branded workwear, the sew-on method pays for itself within 12–18 months of regular use. The time invested in stitching is a one-time cost. Re-pressing or replacing iron-on patches is a recurring one.
Why Iron-On Adhesives Fail: The Science Behind Peeling
Most articles just say “the adhesive weakens over time.” Here’s what’s actually happening.
The thermoplastic polymer used in iron-on patches has a glass transition temperature — a point where it shifts from rigid to soft. Every time a garment is washed in warm or hot water, the adhesive temporarily approaches that threshold. Each cycle slightly degrades the bond between the adhesive and the fabric fibers.
Add UV exposure from sunlight (which breaks down polymer chains), mechanical abrasion from washing, and detergent chemistry (alkaline detergents are especially hard on adhesives), and it becomes clear why iron-on patches fail from the edges inward — that’s where the stress is highest.
Understanding this is why cold water, air drying, and inside-out washing make such a meaningful difference. You’re directly reducing the forces that degrade the adhesive.
Quick Decision Guide: Which Should You Choose?
Use this framework to decide in 30 seconds:
| Your Situation | Best Method |
|---|---|
| Decorative item, rarely washed | Iron-on |
| Cotton or denim, light to moderate use | Iron-on |
| Heavy-use garment washed weekly | Sew-on |
| School uniform or scout sash | Hybrid (iron then sew) |
| Heat-sensitive fabric (nylon, silk, leather) | Sew-on only |
| PVC or chenille patch | Sew-on only |
| Workwear or staff uniform | Sew-on or hybrid |
| Backpack or bag (high friction) | Sew-on or hybrid |
| No sewing skills, need it done today | Iron-on |
Read Also: If you are selling patches online, the type of backing will determine how satisfied your customers are with the quality of your patches and their level of returns. Check out options to sell in Best Print-on-Demand Platforms for Custom Merch.
Frequently Asked Questions
How do I know if my patch is iron-on or sew-on?
Can you sew an iron-on patch on after applying it?
Do iron-on patches stay on jeans?
What's the best stitch for sewing on a patch?
Can I remove a sew-on patch cleanly?
Do iron-on patches come off in the wash?
The Bottom Line: Iron-On vs. Sew-On Patches
For casual, decorative use on cotton or denim — iron-on patches do the job and the convenience is genuinely hard to beat.
For anything that gets washed regularly, faces friction, or needs to last years — sew-on wins every time. The mechanical hold of stitching simply doesn’t degrade the way adhesive does.
And for the most demanding use cases — school uniforms, scout sashes, workwear, merit badges, and kids’ clothing — the hybrid method (iron first, sew after) is the definitive answer. It’s a small upfront investment of time that eliminates the need to ever re-press, re-glue, or replace a patch.
The right choice comes down to your fabric, your use case, and how long you need that patch to stay put. Now you have everything you need to decide.
Have a specific use case not covered here? Drop it in the comments and we’ll give you a straight answer.
Pingback: How to Make Custom Patches for Clothing (Complete 2026 Guide) - Apex Patches