I’ve ordered custom embroidered patches for everything from a small band’s merchandise run to a corporate uniform rollout. The first time, I paid a setup fee I didn’t see coming, waited three weeks, and ended up with a patch where the lettering had blurred into the background twill fabric — because nobody told me my font was too thin for the stitch count.
You don’t have to learn that the hard way.
Whether you’re looking for custom embroidered patches for jackets, a single prototype to test a design, or a run of large custom patches for a growing brand — this guide covers the full picture: who to order from, what it actually costs, how to prep your artwork, and how to avoid the mistakes that end up costing you money and time.
The bottom line up front: you no longer need to hit a minimum order quantity to get quality embroidered patches. Several reputable suppliers will produce even a single patch — here’s how to find the right one for your needs.
What to Look for in a Custom Patch Supplier (Before You Order)
Not all patch suppliers are equal, and the differences only become obvious after you’ve made a mistake. Here are the factors that actually matter.
Stitch Count and Density: Why It Affects Quality

Stitch count is one of the most overlooked quality indicators in patch production. It refers to the total number of individual stitches in your patch, and a higher count generally means better coverage, crisper detail, and a longer-lasting patch.
A professional supplier will digitise your artwork to maximise stitch density without creating a patch so stiff it cracks. Low-cost producers often under-stitch to save machine time — and it shows. The thread sits flat rather than raised, colours look washed out, and small details like thin letters or fine lines disappear.
When requesting quotes, ask whether the price includes a full-density stitch or a light-fill option. For custom embroidered patches for hats especially, high-density stitching is critical because the curved surface adds stress to every thread.
Backing Types Explained (Iron-On, Velcro, Sew-On, Peel-and-Stick)
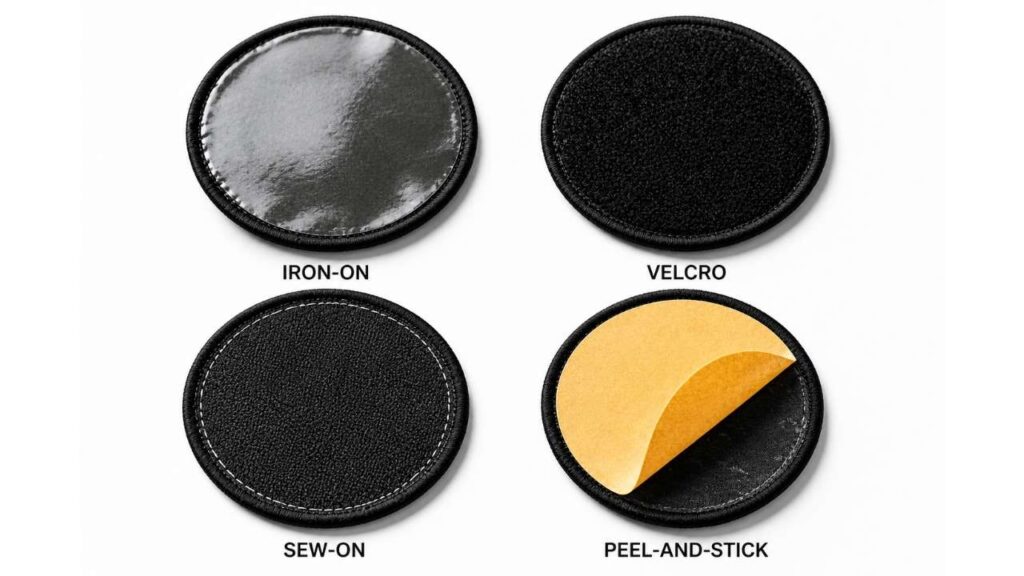
Backing is the adhesive or attachment layer on the reverse of your patch. It’s not an afterthought — it determines where you can use it and how long it lasts.
- Iron-on backing: A heat seal adhesive is fused to the patch back. Apply with a household iron or heat press. Suitable for most fabrics. This is the most popular option for custom embroidered patches iron-on for everyday use.
- Sew-on: No adhesive. The patch is attached by stitching around the border. More durable, better for items that get heavy use or frequent washing. Best for custom sew on patches on denim, leather, or military gear.
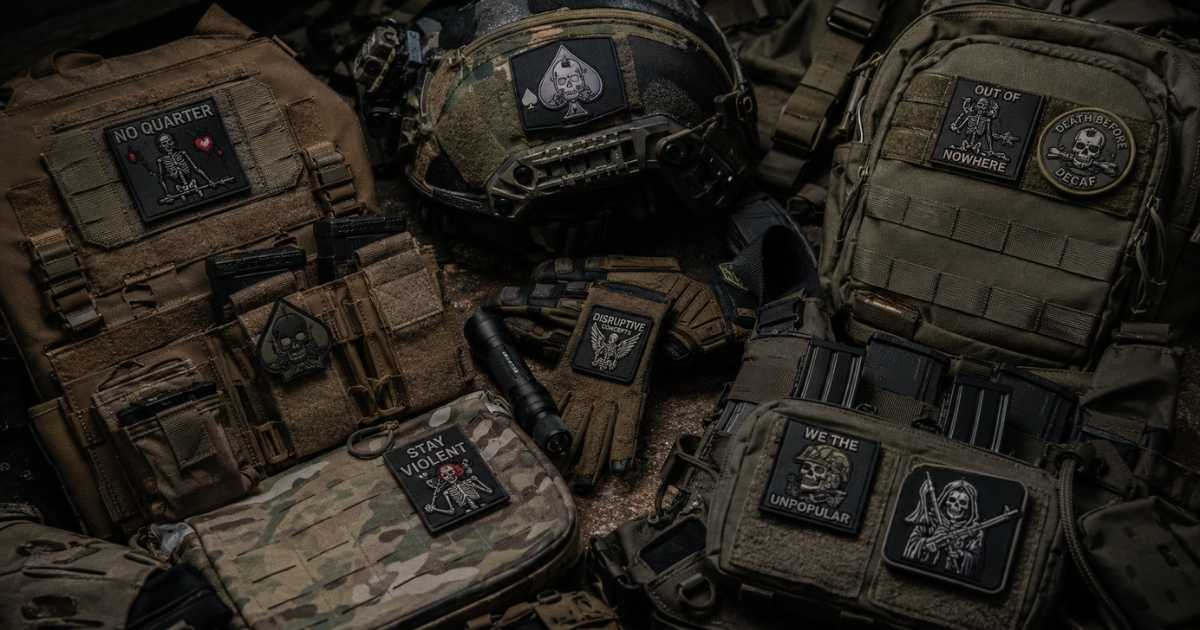
- Velcro patch: A hook-and-loop fastener is attached to the back, allowing patches to be swapped between garments. Widely used for morale patches and tactical patches in military, airsoft, and law-enforcement communities.
- Peel-and-stick: Temporary adhesive backing. Not suitable for clothing but useful for packaging, notebooks, or short-term promotional use.
Turnaround Time vs. Rush Order Options
Most providers quote 10–20 business days for standard production, which includes digitising, sampling, approval, and manufacturing. Rush options — typically 5–7 days — usually attract a surcharge of 20–40%.
Be realistic about timelines. That ’10-day’ window often starts after you approve the digital proof, not when you place the order. If you have an event deadline, factor in at least 3–5 business days for the back-and-forth on your artwork approval.
Best Providers for Custom Embroidered Patches with No Minimums
The no-minimum market has grown significantly. On-demand manufacturing has made it economically viable for suppliers to produce even a single patch. Here’s how the top providers stack up.
Quick-Look Comparison Table
| Provider | Starting price | MOQ | Turnaround | Free digitising | Proof type |
|---|---|---|---|---|---|
| Patches4Less | ~$4–6/patch | None | 10–15 days | Yes | Digital |
| The/Studio | ~$5–8/patch | None | 14–20 days | Yes | Digital + physical |
| Stadri Emblems | ~$5–9/patch | None | 10–14 days | Yes | Digital |
| GS-JJ | ~$2–4/patch | None | 7–12 days | Yes | Digital |
| Etsy makers | ~$6–15/patch | None (often 1) | 3–14 days | Varies | Varies |
Note: Prices are approximate and vary by patch size, colour count, and backing type. Always request a quote for your specific design.
Provider 1 — Patches4Less: Best for Single Patches and Prototypes
Patches4Less is one of the most established names in the US market. They offer free digitising on every order, no minimum order quantity, and a satisfaction guarantee. Their online quote tool is transparent and easy to use.
Turnaround sits around 10–15 days for standard orders. They’re particularly strong for prototype work — their digital proof system is detailed, and their customer service team will flag artwork issues before production starts, which saves you from a costly reprint.
Provider 2 — The/Studio: Best for Bulk + No-Minimum Flex Orders
The/Studio operates on an on-demand manufacturing model, which means they’re equally set up for a single patch or a run of 500. Their strength is flexibility: you can combine patch types, sizes, and backing options within one order.
They also offer a physical sample option before bulk production — a rare feature at this price point. If you’re producing custom jacket patches or name patches for a team or brand where consistency matters, that physical proof is worth it.
Provider 3 — Stadri Emblems: Best for Detail-Heavy or Complex Artwork
Stadri Emblems has built a reputation for handling intricate designs — logos with fine linework, multi-colour crest-style patches, or artwork that requires careful digitising to translate well into thread.
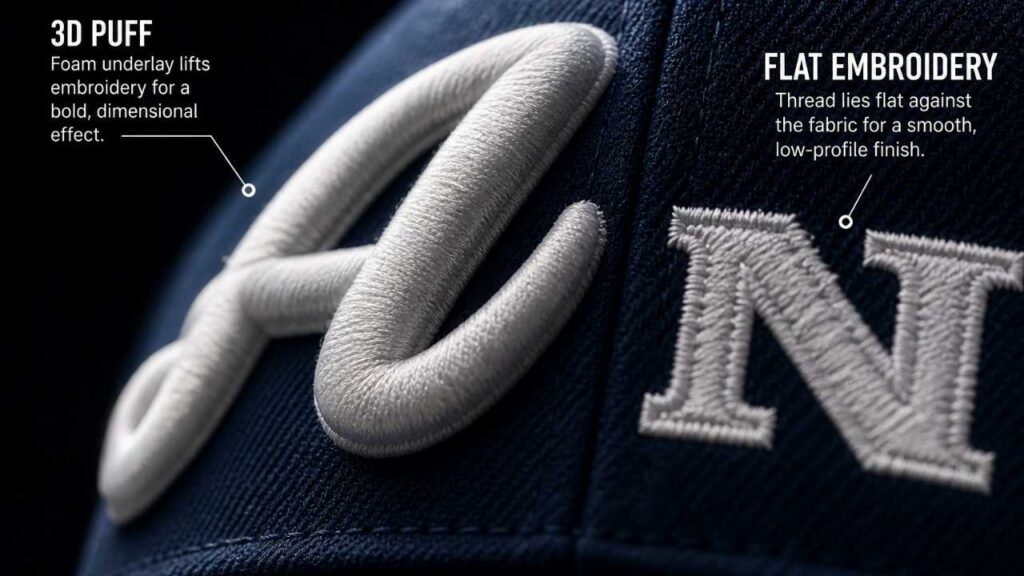
Their in-house digitising team is experienced enough to advise on whether certain design elements need simplification, and they offer 3D puff embroidery as an option for brands that want a premium, raised-logo finish. This technique uses a foam underlay beneath the stitching to give logos extra dimension — it’s particularly effective on hats.
Provider 4 — GS-JJ: Best for Budget-Conscious Buyers
GS-JJ is the go-to for buyers who want quality at low cost per patch. They’re a well-established supplier — also known under the sister brand SINOSTAR — and are highly rated for consistent output on straightforward designs.
Their pricing at higher quantities is difficult to beat. For a 3″ standard patch at 100 units, they often come in significantly cheaper than US-based competitors. Free shipping to the US adds further value. The trade-off is slightly longer turnaround times (production is overseas) and less hand-holding on complex artwork.
Provider 5 — Etsy Custom Patch Makers: Best for Fast Domestic Turnaround
Don’t underestimate Etsy custom patch makers. Many are independent, US or UK-based embroiderers operating with professional commercial machines. They can often turn a single patch around in 3–5 days — faster than any large-scale supplier.
Look for sellers with 4.8+ star ratings, 100+ reviews specifically mentioning patch quality, and who explicitly list ‘custom patches’ as their primary product. Avoid shops that outsource production — you’ll spot them by vague shipping timelines and generic product photos.
Other platforms worth checking for on-demand patch printing include Printify and Redbubble, though these skew more toward woven or sublimated patches rather than true embroidery. Similarly, Threadbird and PinMart serve niche segments of the market — branded merchandise and promotional products respectively.
How Much Do Custom Embroidered Patches Cost? (Real Pricing Breakdown)
Cost Per Patch at Quantities of 1, 10, 50, and 100
These figures are for a standard 3″ embroidered patch with iron-on backing, 6 thread colours, and free digitising included. Actual quotes may vary.
| Provider | 1 patch | 10 patches | 50 patches | 100 patches |
|---|---|---|---|---|
| Patches4Less | ~$18–22 | ~$6–8 each | ~$3.50–4.50 ea | ~$2.50–3 ea |
| GS-JJ | ~$10–14 | ~$4–5 each | ~$2–2.50 ea | ~$1.50–2 ea |
| Etsy makers | ~$12–20 | ~$8–12 each | ~$5–7 ea | ~$4–6 ea |
| The/Studio | ~$20–28 | ~$7–9 each | ~$4–5 ea | ~$3–4 ea |
What Drives Price: Size, Colours, and Stitch Complexity
Three factors move the needle most on price:
- Size: A 2″ patch costs significantly less than a 5″ patch, both in materials and machine time. Larger patches have higher stitch counts, so they take longer to produce.
- Colour thread count: Most suppliers allow up to 12 colours. Beyond that, you’re in specialty territory and pricing climbs fast. Simplifying your palette to 6 or fewer colours can reduce cost per patch by 15–25%.
- Stitch complexity: A text-only patch is faster to digitise and produce than a crest with gradients, shading effects, or fine geometric detail. Chenille patches, which use a loop-pile thread technique, are also more expensive than standard flatlock embroidery.
Hidden Fees to Watch Out For
These are the fees that catch first-time buyers off guard:
- Digitising fee: Converting your artwork into an embroidery-ready DST file costs $10–40 at providers who don’t include it free. Always confirm this upfront.
- Artwork setup fee: Some suppliers charge separately for redrawing or cleaning up your submitted design.
- Backing upgrade: Velcro patch backing can add $0.50–$2 per patch over a standard iron-on.
- Rush fee: Anywhere from 20–50% added to your total if you need faster production.
- International shipping: Overseas suppliers often quote ‘free shipping’ but default to economy freight (4–6 weeks). Express shipping to the US, UK, or AU can add $20–50.
Embroidered vs. Woven vs. PVC Patches: Which Is Right for You?
When Embroidered Outperforms Woven (and Vice Versa)
Embroidered patches use raised thread on a twill fabric base, bordered by a Merrow border — the distinctive wrapped edge that gives patches their clean, finished look. They’re ideal for bold, high-contrast designs and logos where the raised texture adds visual weight and a premium feel.
Woven patches use a thinner, tighter construction — closer to the look of a woven label than traditional embroidery. They’re better suited to designs with very fine detail or small text, where embroidery stitches would be too chunky to render cleanly.
PVC patches are a different category entirely: soft rubber moulded into your design. They’re extremely durable, fully waterproof, and popular for outdoor, tactical, and military applications. They don’t have the traditional look of embroidery but they outperform fabric patches in harsh conditions.
Durability and Wash-Resistance Comparison
- Embroidered: Highly durable. Can withstand 50+ machine wash cycles when properly attached. Iron-on backing may weaken over time; sew-on backing is permanent.
- Woven: Very durable, slightly more flexible than embroidery. Holds colour well through washing.
- PVC: The most durable option. Waterproof, UV resistant, and won’t fray or fade. Does not apply with iron-on heat seal adhesive — must be sewn or attached with velcro.
How to Prepare Your Artwork for Patch Production
Accepted File Formats by Top Providers
Most suppliers accept the following when ordering custom patches online:
- Vector files: AI, EPS, PDF, SVG (preferred — fully scalable with clean edges)
- Raster files: PNG, JPEG — must be 300 DPI or higher at intended print size
- If you have an existing embroidery file, some suppliers can work directly from a DST file (a standard embroidery machine format) — ask if this is accepted to potentially save on digitising fees.
What Digitising Means and Whether You Need to Pay for It
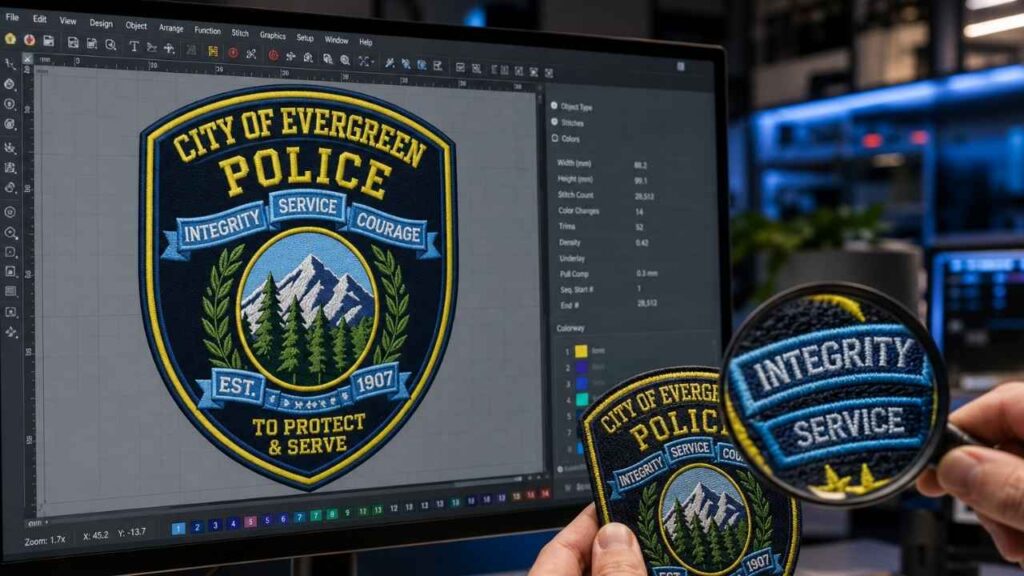
Embroidery digitising is the process of converting your artwork into a stitch-by-stitch instruction file that embroidery machines can read. It’s not automatic — a skilled digitiser makes decisions about stitch type, direction, density, and sequence that directly affect the final quality.
The major providers (Patches4Less, Stadri Emblems, GS-JJ) include digitising free with your order. Some smaller operators charge $15–40 for this, while professional patch digitising software like Wilcom or Hatch can cost hundreds if you want to do it yourself.
For most buyers, paying for quality digitising — or choosing a supplier who includes it — is absolutely worth it. A poorly digitised design cannot be fixed after production.
Design Tips to Avoid Stitch Distortion on Small Patches
- Minimum recommended font size is 4–6mm cap height for legibility in embroidery. Below this, letters merge.
- Avoid hairline strokes and gradients — thread has physical thickness that doesn’t scale down the way ink does.
- High-contrast colour combinations (dark on light, or vice versa) always produce better results than closely related shades.
- For custom embroidered patches from photo, photorealistic images need to be simplified into flat, blocked colours before digitising — ask your supplier to advise on how to adapt your image.
- Round or shield shapes are the most cost-efficient to produce. Highly irregular shapes with many concave curves can increase manufacturing complexity.
People Also Ask — Answered
Can I Order Just One Custom Patch?
How Long Does It Take to Make Custom Patches?
How Much Does a Custom Embroidery Patch Cost?
Are Embroidered Patches Washable?
What's the Cheapest Way to Get Custom Patches Made?
Ordering Custom Patches: What the Process Actually Looks Like
Step-by-Step: From Artwork Upload to Delivery
- Choose your supplier based on quantity, timeline, and design complexity.
- Configure your order: patch size, shape, backing type (iron-on, velcro, sew-on), and colour count.
- Upload your artwork in a supported format (AI, EPS, PNG at 300 DPI minimum).
- Submit for digitising. The supplier converts your design into a stitch file and prepares a digital proof.
- Review and approve your digital proof (see below). This is your only chance to catch issues before production.
- Production begins. Standard timeline: 5–12 business days.
- Shipping. Confirm your preferred shipping speed and whether tracking is included.
How to Review and Approve a Digital Proof
Don’t rush the proof approval. This is where mistakes are cheapest to fix. Check specifically for:
- Font legibility — zoom in on any text smaller than 6mm cap height
- Colour accuracy — compare thread colour codes against your brand colours; request Pantone matching if available
- Border completeness — the Merrow border should be even all the way around
- Stitch direction — diagonal or horizontal fill stitches in backgrounds look different under light; confirm you’re happy with the direction
- Any elements that have been simplified or removed by the digitiser — flag and discuss before approving
What to Do If Your Order Arrives Wrong
First, photograph the issue immediately. Good documentation — showing the received patch next to the approved digital proof — is your strongest tool in any dispute.
- Colour errors: If the shipped thread colours don’t match the approved proof, this is a manufacturing error and the supplier should reprint at no cost.
- Size or shape errors: Again a clear manufacturing defect. Document and raise within 7 days of delivery.
- Quality concerns (uneven stitching, loose threads): Most reputable suppliers have a quality guarantee. GS-JJ, Patches4Less, and Stadri Emblems all offer reprints or refunds for documented quality issues.
- Artwork disagreements: If the final product matches your approved proof but you don’t like the result, this is harder to dispute — which is precisely why proof review matters.
Always email, not just chat — a written record is essential if a dispute escalates.
The Bottom Line
Custom embroidered patches are one of the few personalised products where quality and affordability genuinely coexist — if you know where to look and what to ask for. The no-minimum revolution means you no longer have to commit to 50 patches to get started.
If you’re ordering for the first time: start with a small run (1–5 patches) to check colour accuracy, stitch density, and how the backing performs on your specific fabric. Then scale. If you’re ordering at volume: the pricing tables above show where the real savings begin — and they begin fast once you cross 50 units.
Most importantly: invest time in artwork preparation and proof review. A supplier can only produce what your design allows. Get that right, and the rest is straightforward.
“The single biggest mistake buyers make is approving a digital proof without zooming in on the small details. A proof that looks great at thumbnail size can have illegible text and blown-out detail when you see the actual patch. Always view at 100% zoom before you approve.” — Embroidery production specialist, 12 years’ experience