You’ve seen it on polo shirts, baseball caps, and company jackets, that raised, textured logo that looks almost too perfect to be handmade. It isn’t. Behind every clean, professional embroidered design is a process called embroidery digitizing, and it’s the bridge between a flat digital image and a physical masterpiece stitched in thread.
If you’ve ever wondered how a company logo ends up perfectly replicated on hundreds of uniforms, or how a hobbyist turns their artwork into a custom embroidery project, this guide answers everything. Whether you’re a complete beginner, a small business owner exploring logo digitizing, or a maker looking to pick up a new skill — you’re in the right place.
Let’s start from the beginning.
What Exactly Is Embroidery Digitizing?
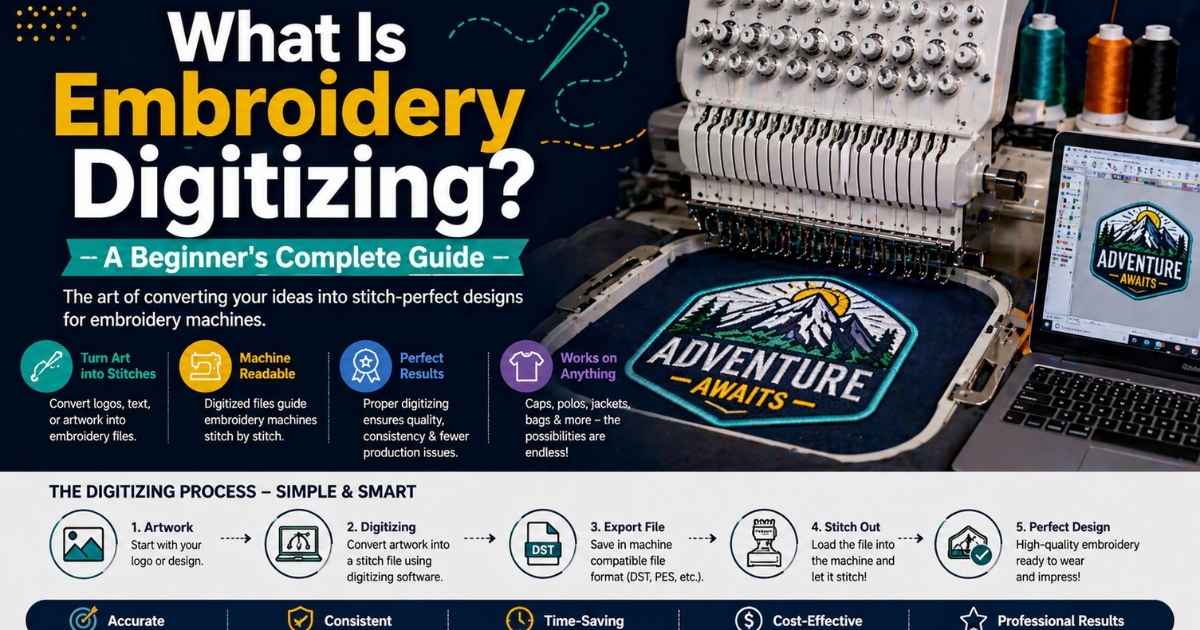
Embroidery digitizing is the process of converting artwork, a logo, or any image into a stitch file — a digital file that tells an embroidery machine exactly where to sew, what stitch type to use, in what direction, and at what density.
Think of it this way: an embroidery machine can’t “look” at a JPEG and start stitching. It needs a precise set of instructions, just like a GPS needs turn-by-turn directions rather than just a destination. That instruction set is the machine embroidery design file created through digitizing.
The result is a file format your machine can read — such as a .DST file, a .PES file, or one of many other embroidery machine formats — which the machine then executes, stitch by stitch.
How is it different from regular embroidery?
Traditional, hand embroidery is guided by a skilled person’s eye, needle, and thread. Every stitch decision is made in real time. Machine embroidery delegates those decisions to software and hardware — but someone still has to program those decisions in advance.
That programming step is digitizing. It’s the human creative layer that sits between your artwork and the machine. Without it, the machine has nothing to follow.
Why “painting with stitches” is the best analogy
The most accurate way to understand digitizing is to think of it as painting with stitches. Just as a painter selects brush type, direction, and pressure for each stroke, a digitizer selects stitch type, angle, and density for each section of a design.
And just like painting, there are rules. Thread behaves differently on fleece than on denim. A satin stitch that looks perfect on a 3-inch design can fall apart at half an inch. A fill stitch that works beautifully on a flat cap fails on a stretchy polo. Understanding how thread interacts with fabric is what separates a mediocre digitized design from a professional one.
Ready to take the next step? Explore our guides on [Best Embroidery Companies in the USA (2025–2026)]
How Does Embroidery Digitizing Work? (Step-by-Step)
Step 1 — Preparing your artwork
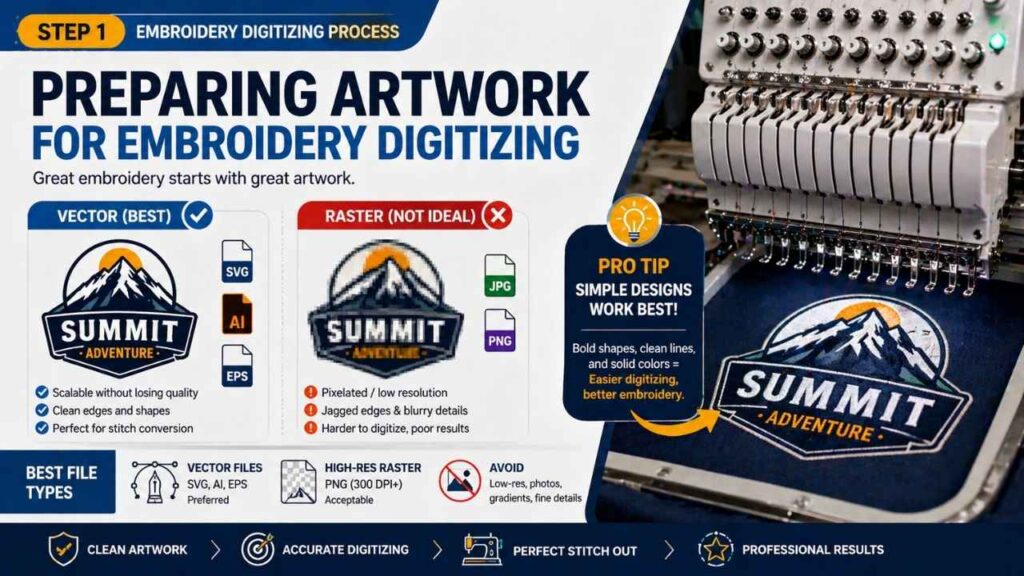
Everything starts with the image you want to digitize. The golden rule: the cleaner your artwork, the better your result.
- Vector files (SVG, AI, EPS) are ideal — they’re scalable, have clean edges, and translate well into stitch paths.
- High-resolution raster images (PNG, JPG) can work but require more manual clean-up.
- Avoid photos, gradients, and images with excessive fine detail — these don’t translate well into thread.
If your artwork is a low-res raster, you’ll likely need raster-to-vector conversion first (using tools like Inkscape or Adobe Illustrator) before importing into your digitizing software.
Pro tip: Simple, bold designs with clear outlines and solid color blocks are always the easiest to digitize — especially for beginners.
Step 2 — Importing into digitizing software
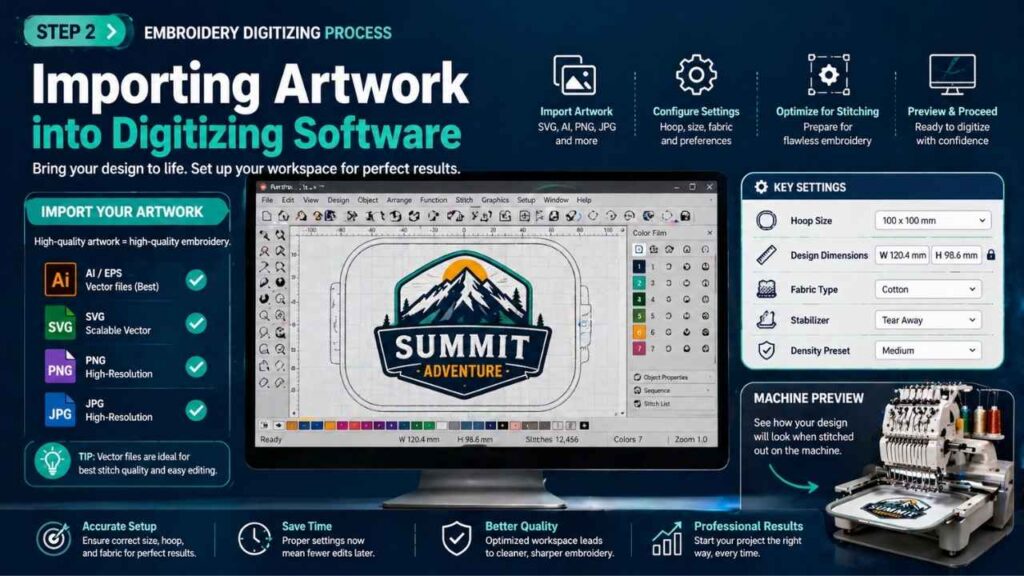
Once your artwork is ready, you import it into your embroidery digitizing software — programs like Hatch Embroidery, Wilcom, Embrilliance StitchArtist, or the free Ink/Stitch plugin for Inkscape.
At this stage, you set up your workspace:
- Define the hoop size (the physical area the machine will stitch within)
- Set design dimensions
- Confirm the fabric type you’re working with
Your software becomes your command centre. Everything from stitch paths to thread color assignments happens here.
Step 3 — Assigning stitch types and directions
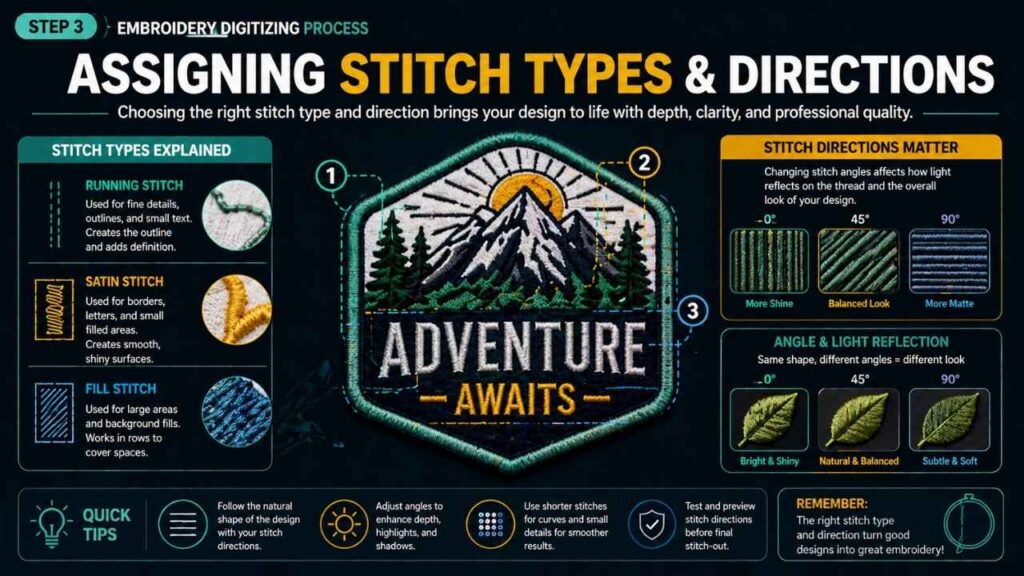
This is where real digitizing skill comes in. You manually (or semi-automatically) assign stitch types to each region of your design:
- Outlines and details → running stitch
- Text and borders → satin stitch
- Large filled areas → fill stitch
Stitch direction matters enormously. Changing the angle of a fill stitch can alter the way light reflects off the finished design, creating dimension and visual interest. Getting this wrong can make a design look flat or muddy in thread.
Step 4 — Setting density, underlay, and pull compensation
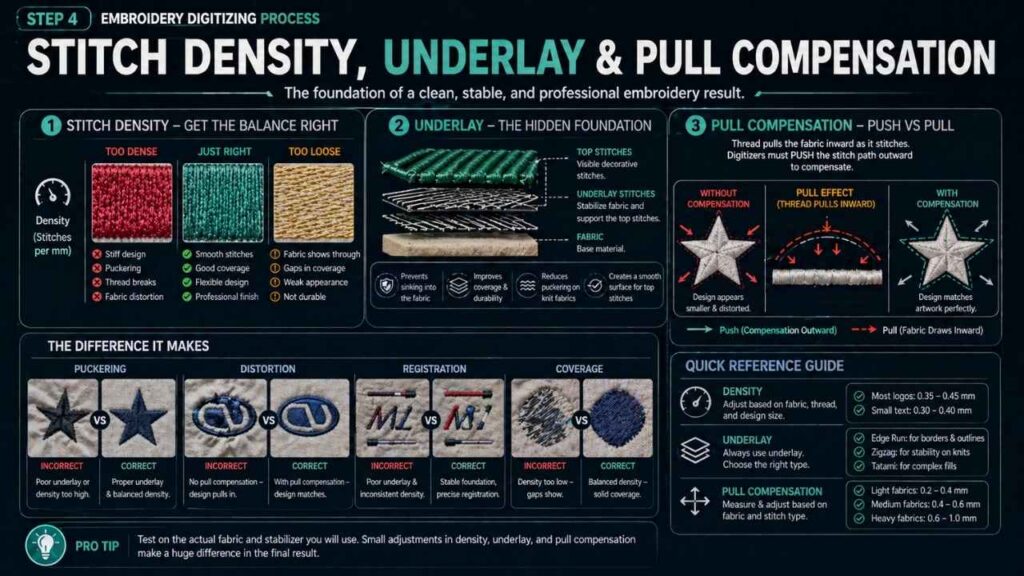
This is the most technical — and most important — step for beginners.
Stitch density refers to how closely packed the stitches are. Too dense, and the design stiffens the fabric or breaks thread. Too loose, and the fabric shows through.
Underlay stitches are a hidden layer of stitches placed before the main design. They stabilize the fabric, create a foundation for top stitches, and prevent the design from sinking into textured fabrics like fleece. Most beginners skip underlay — and it shows immediately in the finished product.
Push and pull compensation accounts for the physical tension that thread places on fabric during sewing. Thread pulls fabric inward as it stitches. A digitizer must push the stitch paths slightly outward to compensate, so the final design matches the original artwork. This is one of the most under-explained concepts in embroidery, and mastering it dramatically improves your results.
Step 5 — Previewing and simulating the stitch-out

Most professional digitizing software — including Wilcom, Tajima DG/ML, and Hatch Embroidery — includes a stitch simulation tool. This lets you preview exactly how the design will sew out, in sequence, before sending it to your machine.
Use simulation to:
- Spot areas where stitches overlap awkwardly
- Identify unnecessary thread trims
- Check pathing — the order in which sections stitch out — to minimise thread breaks and jumps
Step 6 — Exporting the embroidery file
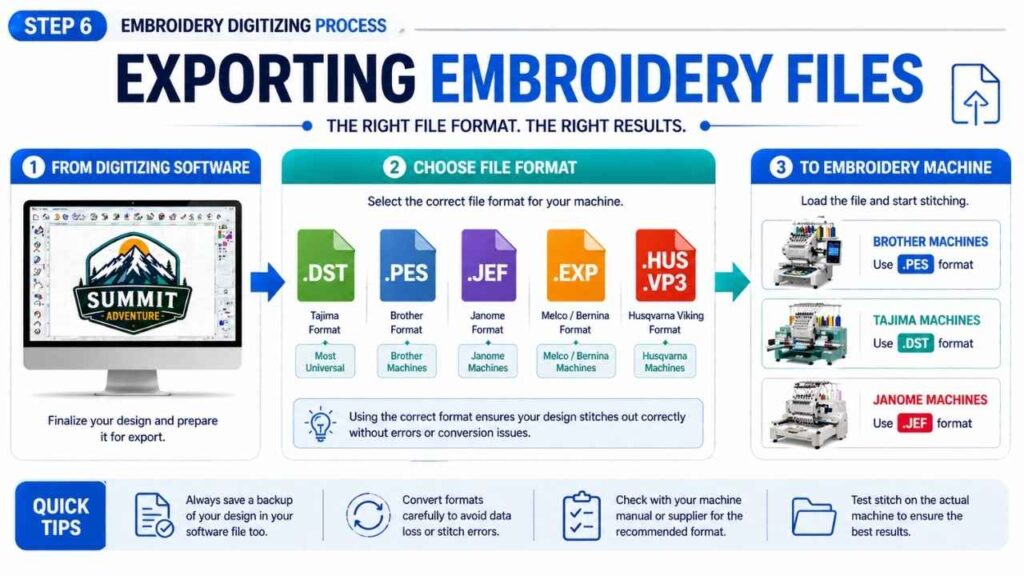
Once the design is finalized, you export it in the correct format for your machine. Common formats include:
- .DST — Tajima format, the near-universal standard
- .PES — used by Brother machines
- .JEF — Janome format
- .EXP — Melco/Bernina format
- .HUS / .VP3 — Husqvarna Viking format
If you’re using a service bureau or sending to a client with a different machine, you may need to convert between formats.
Step 7 — Testing on a physical machine
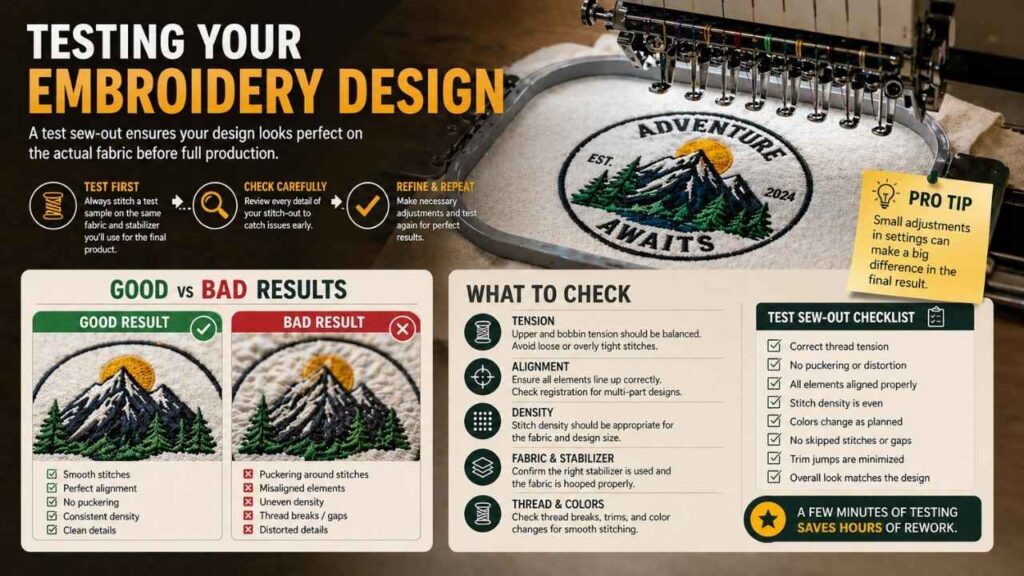
Never skip this step. Always sew out a test on the same fabric and stabiliser you plan to use for the final product. Even the most experienced digitizers refine their designs after a physical test.
A test sew-out will reveal:
- Thread tension problems
- Puckering or distortion
- Registration issues (elements not lining up)
- Areas where stitch density is too high or too low for the specific fabric
The Three Essential Stitch Types Every Beginner Must Know
Running stitch — outlines and details
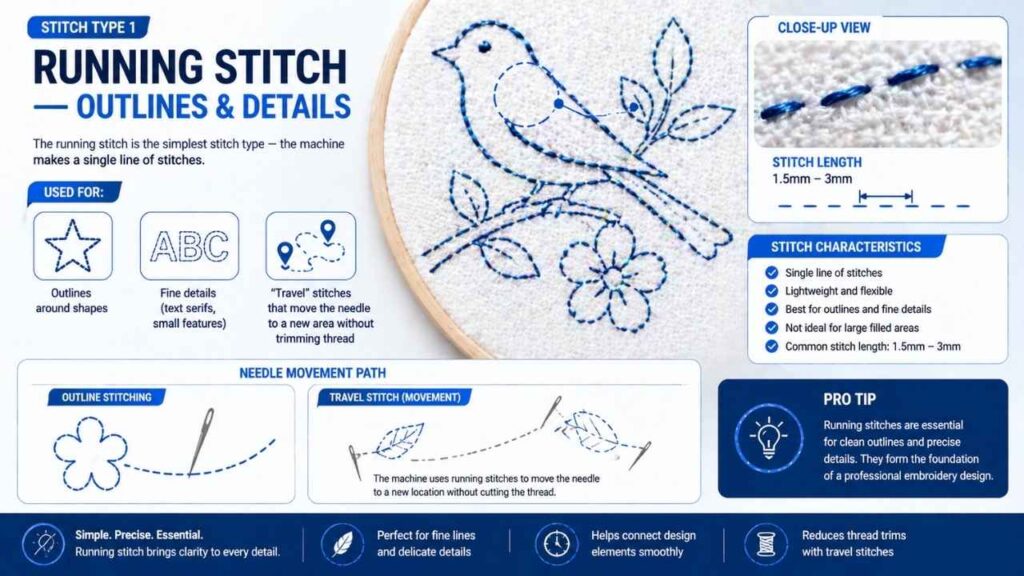
The running stitch is the simplest stitch type — the machine makes a single line of stitches. It’s used for:
- Outlines around shapes
- Fine details (text serifs, small features)
- “Travel” stitches that move the needle to a new area without trimming thread
Running stitches are typically 1.5mm–3mm in length. They’re lightweight but lack the coverage of satin or fill stitches.
Satin stitch — smooth fills and text
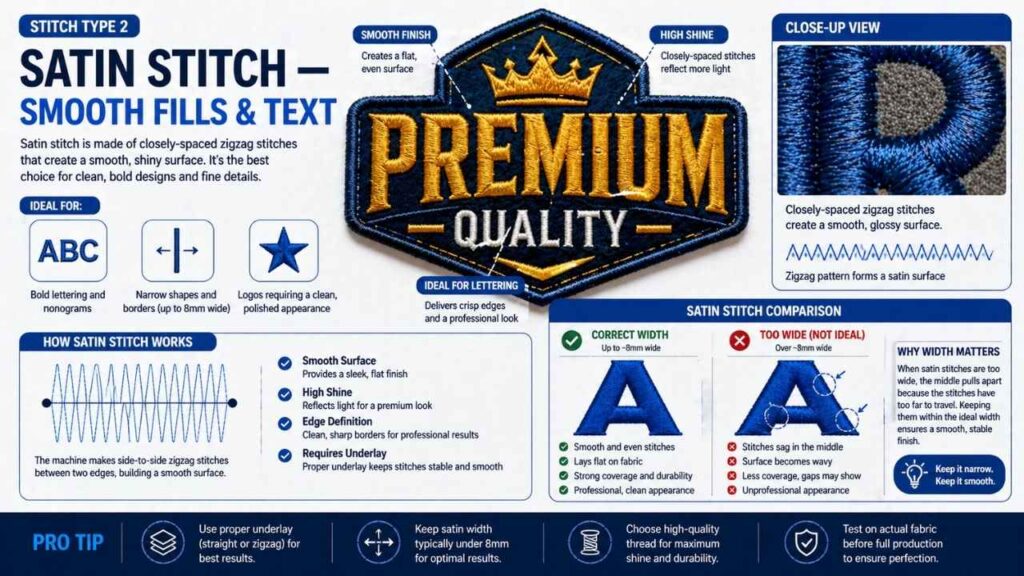
The satin stitch consists of closely-spaced zigzag stitches that create a smooth, shiny surface. It’s the go-to choice for:
- Bold lettering and monograms
- Narrow shapes and borders (up to about 8mm wide)
- Logos where a clean, polished appearance is essential
The challenge with satin stitches: they struggle with very wide areas (they can sag and pull) and don’t work well at very small sizes. Proper underlay stitches are critical beneath satin to keep the surface smooth.
Fill stitch — large solid areas
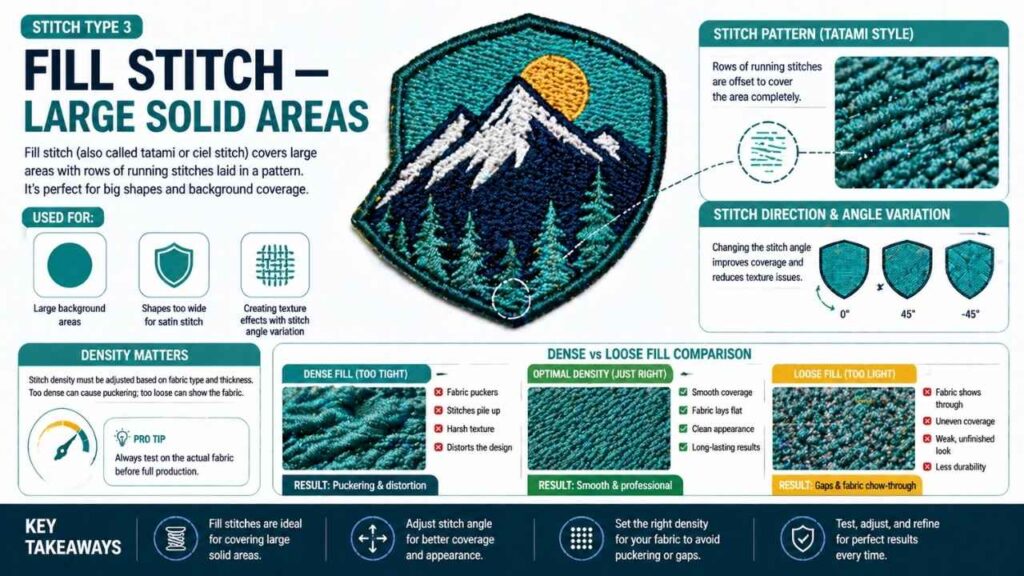
Also called a tatami stitch or ciel stitch, the fill stitch covers large areas with rows of running stitches offset in a pattern. It’s used for:
- Large background areas
- Shapes too wide for satin stitch
- Creating texture effects through stitch angle variation
Stitch density is especially critical in fill stitches — and the correct setting varies by fabric type. A dense fill on a thin cotton shirt can cause puckering; too light a fill on fleece can make the fabric show through.
What Software Do You Need for Embroidery Digitizing?
Best beginner-friendly options (Hatch, Embrilliance)
Hatch Embroidery (by Wilcom) is arguably the best starting point for serious beginners. It offers a structured learning curve, strong auto-digitizing features, and a clean interface without overwhelming professionals-only tools. It’s available in tiered levels — Hatch Maker, Creator, and Digitizer — so you can start small and upgrade.
Embrilliance StitchArtist is another excellent beginner choice, particularly for Mac users. It’s modular (buy only what you need), integrates neatly with Embrilliance’s other products, and has a supportive community with solid tutorial resources.
Both offer trial versions — always test before purchasing.
Professional-grade software (Wilcom, Tajima DG/ML)
Wilcom EmbroideryStudio is the industry standard for professional and commercial digitizing. Used by professional studios, decoration businesses, and corporate branding departments worldwide, it offers the most granular control over every stitch parameter. It’s expensive — but for high-volume, complex work, nothing matches it.
Tajima DG/ML by Pulse is another industry heavyweight, particularly popular in commercial embroidery houses and those working with Tajima industrial machines. It handles complex multi-head production workflows that consumer software simply can’t manage.
Free options for absolute beginners (Ink/Stitch, SophieSew)
Ink/Stitch is a free, open-source digitizing software plugin for Inkscape. It’s surprisingly capable and is a legitimate way to learn the fundamentals of digitizing without spending a penny. The interface is less polished than paid options, but the stitching output — when done carefully — is professional.
SophieSew is another free option for Windows users, offering basic digitizing tools for simple designs. Ideal for those who want to experiment before committing to paid software.
How to choose software based on budget and goals
| Goal | Recommended software |
|---|---|
| Hobbyist, zero budget | Ink/Stitch (free) |
| Hobbyist, willing to invest | Embrilliance StitchArtist |
| Small business owner | Hatch Embroidery (Creator level) |
| Professional digitizer | Wilcom EmbroideryStudio |
| Commercial production house | Tajima DG/ML by Pulse |
The most important thing: pick one and commit. Jumping between software slows learning dramatically. Every platform has its own logic — mastery comes from repetition, not variety. To explore the top service providers in detail, don’t miss our guide: Best Embroidery Companies in the USA (2025–2026).
What Embroidery File Formats Do You Need to Know?
.DST — the industry universal format
The .DST file (Tajima format) is the closest thing embroidery has to a universal language. Nearly every commercial embroidery machine — including Tajima and Barudan industrial units — can read DST files. When in doubt about what format a client or service bureau needs, DST is almost always a safe default.
One limitation: .DST files don’t store thread color information natively. Color assignments need to be managed separately.
.PES — Brother machine format
The .PES file format is proprietary to Brother embroidery machines, which are among the most popular home machines globally. .PES files do store color information, making them more self-contained for home use. If you’re using a Brother machine — such as the popular Brother SE or Innov-ís series — .PES is your native format.
.JEF, .EXP, .HUS — other common formats by brand
- .JEF — native to Janome machines
- .EXP — associated with Melco and older Bernina machines
- .HUS / .VP3 — used by Husqvarna Viking machines
- .XXX — Singer format
- .ZHY — ZSK industrial machines
Most modern digitizing software can export to multiple formats simultaneously — so if your design needs to run on both a Brother home machine and a Barudan commercial unit, you simply export twice.
How to convert between file formats
Format conversion is straightforward in most paid digitizing software — export the design, choose the target format, done. For free conversion, tools like Embird’s format converter or online platforms can handle basic conversions. However, converting between formats can sometimes cause stitch quality loss — always test a converted file with a sew-out before final use.
What Embroidery Machines Are Compatible?
Home machines for beginners (Brother, Janome, Bernina)
For beginners, three brands dominate the home embroidery space:
- Brother — the most popular entry-level brand globally. Models like the SE700 and Innov-ís series offer great value, a large hoop size, and a massive online community. Reads
.PESfiles. - Janome — known for build quality and reliability. The Janome Memory Craft series is excellent for intermediate users. Reads
.JEFfiles. - Bernina — premium Swiss engineering. More expensive, but the stitch quality and precision are exceptional. Popular with serious hobbyists and small studios.
All three are single-needle machines (one thread at a time), meaning thread color changes require you to manually re-thread — an important consideration for complex multi-color designs.
Commercial/industrial machines (Tajima, Barudan, ZSK)
When volume and speed matter, the industry turns to:
- Tajima — the world’s most recognized commercial embroidery brand. Multi-needle heads, high-speed stitching, and rock-solid reliability. The benchmark for commercial shops.
- Barudan — a Japanese competitor to Tajima with an equally strong commercial reputation. Common in production embroidery facilities across Asia and Europe.
- ZSK — German-engineered commercial machines known for precision, particularly popular in technical embroidery and 3D puff embroidery applications.
Single-head vs multi-head — what’s the difference?
A single-head machine has one embroidery arm and stitches one item at a time — ideal for custom, low-volume work. A multi-head machine has multiple arms (typically 2–20+) that stitch identical designs simultaneously, dramatically increasing production output. Commercial operations almost universally use multi-head setups.
How Long Does It Take to Learn Embroidery Digitizing?
Digitizing is a genuine skill — not something mastered in a weekend. Here’s a realistic progression:
- Week 1–2: Learn your software interface, understand the three core stitch types, complete your first simple design (text or basic logo)
- Month 1: Grasp density, underlay, and basic pathing. Complete 5–10 simple projects.
- Month 2–3: Tackle push/pull compensation, multi-color designs, and fabric-specific adjustments.
- Month 4–6: Work on complex logos, tackle lettering at small sizes, and refine your sew-out testing process.
- Year 1+: Develop a feel for nuanced decisions — this is where craft becomes art.
Most beginners can produce acceptable work within a month of consistent practice. Producing great work takes six months to a year.
Skills you need before you start
You don’t need prior embroidery experience to start digitizing, but these help significantly:
- Basic understanding of how embroidery machines function
- Comfort with graphic design concepts (layers, shapes, paths)
- Patience for iteration — digitizing rewards those willing to sew out, assess, and refine
Best free and paid courses for beginners
- Embroidery Legacy (John Deer) — the most widely respected free digitizing course online. John’s background as a commercial digitizer gives the content depth that YouTube tutorials can’t match.
- Wilcom’s official tutorials — excellent for Hatch Embroidery and WilcomEmbroidery Studio users.
- Embrilliance’s YouTube channel — practical, beginner-friendly walkthroughs.
- Udemy — several affordable courses covering Hatch and Ink/Stitch for beginners.
Should You Digitize Yourself or Hire a Digitizing Service?
When DIY digitizing makes sense
Learn and digitize yourself if:
- You produce a high volume of original designs regularly
- You want full creative control over your custom embroidery
- You have time to invest in a 3–6 month learning curve
- Your designs are relatively simple (logos, text, basic illustrations)
The long-term economics strongly favour in-house digitizing for anyone doing consistent embroidery work.
When to outsource (cost, complexity, volume)
Hire a professional digitizing service if:
- You need a one-off design and can’t justify the software cost
- Your design is highly complex (photo-realistic art, intricate gradients, very small lettering)
- You need the design fast — professional services typically turn around files in 4–24 hours
- Quality is non-negotiable and you’re not yet confident in your own output
How much does professional digitizing cost?
The average professional digitizing cost in the USA ranges between $10 and $40 for a standard logo. More complex designs run higher:
- Left chest / cap logo: $10–$25
- T-shirt front / mid-size design: $20–$50
- Jacket back (large format): $50–$100+
- 3D puff embroidery: $30–$75
Key factors that affect the price include design complexity, stitch count, number of color changes, and fabric type. Rush fees typically add $10–$20 for 24-hour turnaround.
One important note: digitizing is a one-time cost per design. Once you own the stitch file, you can run it on your machine hundreds of times without paying again.
Common Beginner Mistakes (and How to Avoid Them)
Using raster images instead of vectors
The most common mistake. Importing a blurry JPEG logo and hoping the software will figure it out leads to jagged stitch paths and poor results. Always start with a clean vector file where possible. If you only have a raster image, run it through a proper raster-to-vector conversion in Inkscape or Illustrator first — don’t skip this step.
Wrong stitch density for the fabric
What works on a stable woven cotton may completely fail on stretchy jersey or thick fleece. Stitch density must be adjusted for each fabric type. A starting rule of thumb:
- Woven fabrics (cotton, poplin): standard density
- Knit/stretchy fabrics: reduce density, increase underlay
- Thick fabrics (fleece, towelling): increase underlay, consider reducing overall density
Always test on the actual fabric — not just similar fabric.
Forgetting underlay stitches
Underlay stitches are invisible in the finished design, but they’re doing enormous structural work underneath. Skipping underlay is the single most common reason beginner designs look flat, puffy, or poorly registered. Every satin stitch column needs an underlay. Every fill area needs a foundation. Never skip it.
Designing too small with too much detail
Embroidery has physical limits. A design that looks stunning on screen can become an unreadable blob when stitched at 1 inch wide. The general rule: the smaller the design, the simpler it needs to be. Thin lines disappear. Small text fills in. Fine details merge into thread chaos.
When sizing down a design, simplify aggressively — remove details that won’t survive the translation to thread.
People Also Ask — Quick Answers
Is embroidery digitizing hard to learn?
Can I use Photoshop or Illustrator to digitize embroidery?
What's the difference between auto-digitizing and manual digitizing?
How much does embroidery digitizing software cost?
What is a stitch count and why does it matter?
- Pricing — professional digitizing services and embroidery production shops often charge based on stitch count
- Production time — higher stitch counts take longer to sew out
- Design suitability — very high stitch counts on lightweight fabrics can cause distortion
Can AI digitize embroidery automatically?
The Future of Embroidery Digitizing (2026 and Beyond)
The biggest shift in embroidery digitizing is the integration of AI and machine learning into the digitizing workflow. New tools are emerging that can analyze artwork, suggest optimal stitch types, and even adjust stitch density based on declared fabric type — dramatically reducing the time from design to finished file.
Coloreel represents another frontier — a technology that can change thread color mid-stitch without stopping the machine, opening possibilities for gradient and photorealistic embroidery that were previously impossible. As AI matures and tools like Coloreel become mainstream, the ceiling for what’s achievable in machine embroidery design will rise significantly.
3D puff embroidery and mixed-media techniques
3D puff embroidery — where foam is placed under stitches to create a raised, three-dimensional effect — is seeing a strong resurgence, particularly in streetwear, sports branding, and headwear. Digitizing for puff requires specific techniques: higher stitch density to secure the foam, modified underlay, and careful design simplification. ZSK machines are particularly well-regarded for complex 3D puff work.
Appliqué is another growing mixed-media technique — combining fabric pieces with embroidery stitching to create designs that blend texture, color, and dimension in ways pure thread work can’t achieve. Modern digitizing software handles appliqué workflows natively, making it increasingly accessible to small studios.
How digitizing is shaping fashion and branding
Custom embroidery has gone from a corporate uniform staple to a full-blown fashion statement. Direct-to-garment brands, independent designers, and luxury fashion houses are all investing heavily in embroidery as a differentiator. The ability to logo digitize at scale — running the same perfect design on hundreds of garments — has made embroidery a viable branding tool for businesses of every size.
Meanwhile, the rise of on-demand embroidery (small batches, highly customized) is being enabled by faster, smarter digitizing workflows. The future belongs to those who understand both the art and the technology — human creativity amplified by increasingly intelligent tools.
Summary
Embroidery digitizing is the art and science of converting artwork into stitch-by-stitch instructions that an embroidery machine can execute. It involves:
- Preparing and importing artwork (ideally vectors) into digitizing software
- Assigning stitch types — running, satin, and fill — to each area of the design
- Setting technical parameters: stitch density, underlay stitches, and push/pull compensation
- Exporting in the correct format (.DST, .PES, .JEF, and others) for your specific machine
- Testing physically on the actual fabric before final production
Mastering embroidery digitizing takes months of consistent practice, but the rewards — creative control, cost savings, and the ability to bring any design to life in thread — are substantial. Whether you start with free software like Ink/Stitch, invest in Hatch Embroidery, or work toward professional tools like Wilcom or Tajima DG/ML, the path is the same: start simple, sew out constantly, and refine with every design.
The stitch that separates amateurs from professionals isn’t talent — it’s understanding.